Pegasus Server
CatDV Pegasus Server introduces a number of new features to CatDV Server aimed at supporting and managing larger deployments:
Advanced Search Engine – using full-text indexing to allow fast free-text searches over the complete database and also supporting search hints.
Enhanced Permissions System – based on Access Control Lists allowing far greater control over catalog and clip permissions.
Full Audit Logging – logs every update to every clip and stores per-clip and per-catalog usage information.
Reporting Support – allows detailed reports to be created presenting vital usage statistic in wither tabular or graphical formats.
Support for encrypted databases.
Group-based administration – non-system admin users can configure their group.
Database flexibility – the ability to use Oracle and Microsoft SQL Server databases, in addition to MySQL.
These features require a Pegasus Server license.
Advanced Search Engine
The Advanced Search Engine makes use of full-text indexing to allow greatly enhanced performance of general text queries.
Conventional database indexes do not index individual words within text fields. This means that if a user searches for an individual word the database has to scan every string in the entire database where that word might occur. As the size of the database increases this becomes slower and slower to the point where it becomes impractical.
Full-text indexing maintains indexes on each individual word in all text fields in the database, so that the database can go straight to the clips which contain a given word or words. This can speed free text searching up by orders of magnitude on larger databases.
Furthermore the text index itself can be used to provide hints to the user as to what strings to search for, allowing as-you-type search suggestions to be provided.
Setting up Full-Text Indexing
To enable full-text indexing you must have a valid Pegasus Server licence. You also need to enable the feature by entering the following text into the ‘Other’ field in the Server Config screen in the CatDV Server Control Panel:
catdv.fullTextIndexing = true
You will then need to shut down CatDV Server.
Assuming this is an existing installation with data already loaded in the database then you need to build an initial full-text index. This is done in the CatDV Server Control Panel by selecting ‘Rebuild Text Index..’ from the Tools menu. Building the initial index can take some time depending on the size of the database and CatDV Server must remain shut down during this time.
Once the index has been built you can start CatDV Server and full text indexing will be enabled.
NOTE: Full text indexing only affects free text searches such as using the simple search box in the web interface or when performing a fuzzy search on all log and media fields from the desktop client.
NOTE: Searches against individual fields continue to use normal database indexes. This means searches for ‘equals’ or ‘starts with’ are much faster than searches for ‘contains’ or ‘ends with’.
Search Hints
Search hints provide as-you-type hints to the words or phrases that a user might want to search for using knowledge of the words and phrases that are actually present in the database.
Currently search hints are only implemented in the CatDV Web 2 interface.
Enhanced Permissions System
CatDV Enterprise Server defines permissions by specifying what actions the users with a given Role can perform on the catalogs in a particular Catalog Group (formerly Production Group).
Pegasus Server extends this model to allow permissions to be specified not just based on users with a specific role, but also individual users or users that meet particular criteria – such as belonging to a certain ‘team’.
Likewise user permissions can now be applied not just to catalog groups, but to individual catalogs or to catalogs that meet certain criteria – such as being within a particular catalog folder.
These enhanced permissions are implemented using Access Control Lists or ACLs and can be administered using the Web Admin UI.
NOTE: currently if you enable ACLs you must use the Web Admin UI to administer permissions. Any permissions set up using the Server Admin panel in the desktop client will be ignored.
Enabling Enhanced Permissions (ACLs)
To enable ACLs you must have a valid Pegasus Server licence. You also need to enable the feature by entering the following text into the ‘Other’ field in the Server Config screen in the CatDV Server Control Panel:
catdv.accessControlLists = true
You will then need to restart CatDV Server.
Configuring Enhanced Permissions (ACLs)
Access Control Lists are configured in the Catalog Groups section of the CatDV Web Administration UI.
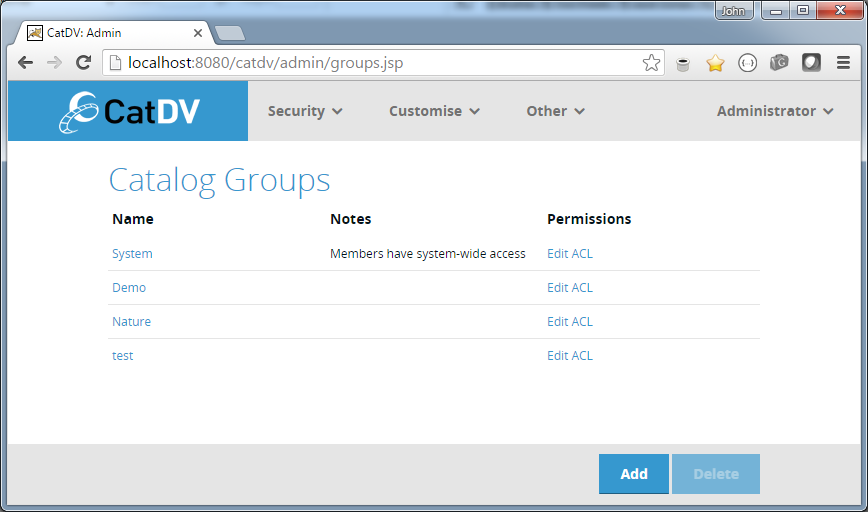
With Enhanced Permissions enabled the Edit Permissions link next to each group changes to Edit ACL. Clicking on this link brings up the ACL Editor for that catalog group.
Access Control List Editor
The Access Control List Editor allows the Access Control List for a particular catalog group to be edited.
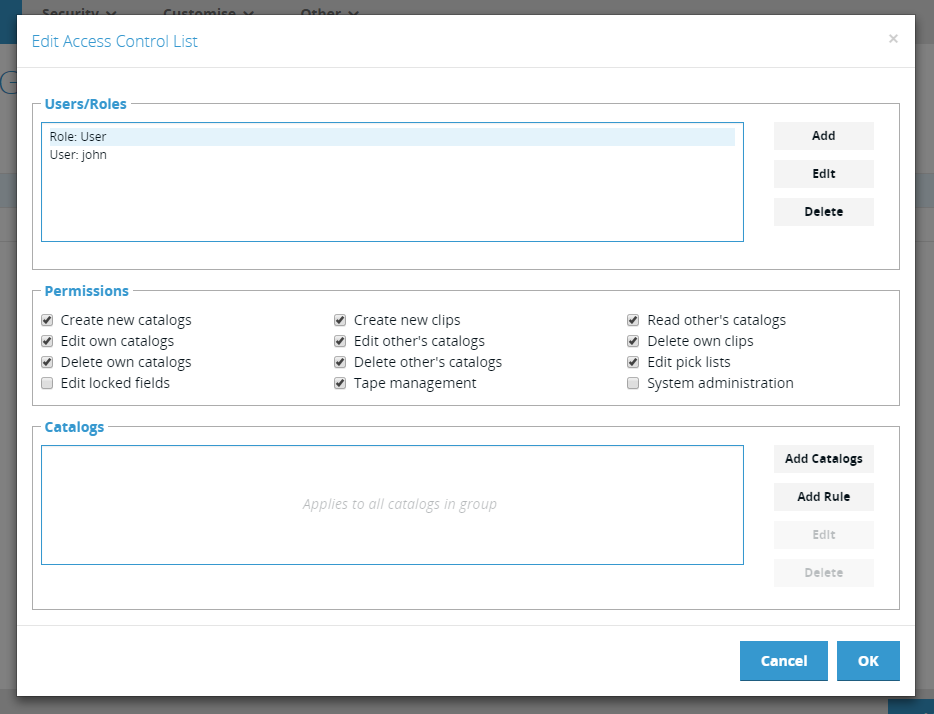
An Access Control List is a list of Access Control Rules. Each Access Control Rule consists of three parts:
User Selector – specifies which users this rule applies to. This selector might specify one or more individual users, a Role (in which case the rule applies to all users that have that role), or a user field value (in which case the rule applies to all users who have the specified value in the specified field).
Permissions – specify what permissions the users defined by the User Selector have on the catalogs defined in the Catalog Selector.
Catalog Selector – specifies which catalogs within the current group the rule applies to. This selector might specify individual catalogs, or catalog groups or rules that select multiple catalogs based on specific criteria. If there is no Catalog Selector then the Access Rule applies to all catalogs within the current group.
NOTE: In the Access Control List Editor the Users/Role section lists the User Selectors for all the Access Control Rules in the current Access Control List. Selecting one of these User Selectors selects the related Access Control Rule and updates the Permissions and Catalogs sections to display the Permissions and Catalog Selectors for the selected Access Control Rule. If no User Selector is selected in the top section the Permissions and Catalogs sections are inactive.
User Selector Editor
Clicking Add in the Users/Roles section, or selecting an existing User Selector from the Users/Roles list and clicking Edit, opens the User Selector Editor.
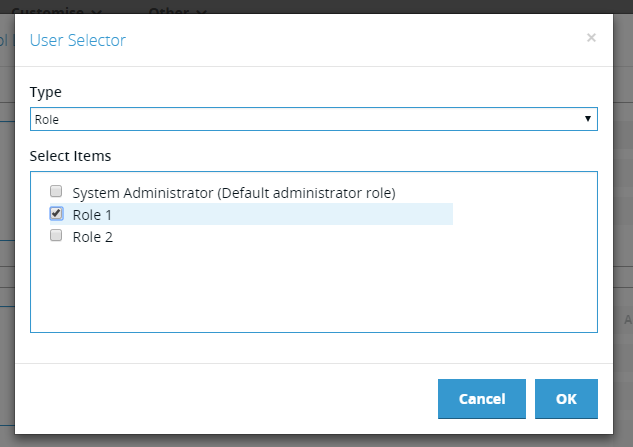
NOTE: clicking Add to add a user selector creates a new Access Control Rule with the newly created user selector.
User Selectors can be one of a number of types:
User – a list of individually selected users
Role – users who belong to any of the selected Roles
Custom Field – users who have a particular value for a user-defined field
After selecting the type from the Type drop down the user then selects the items in the checkbox list below. In the above example the selector type has been set to Role and Role 1 has been chosen from the available Roles. This means that this selector will select for all users in Role 1.
Custom Field User Selectors
In the example below there are two custom entries in the type selector – Subject and Year Group:

These fields are intended to model typical college students, where each user (student) is studying a particular subject and is in a particular year group. These two custom fields are defined as picklists that have a list of predefined values, which are presented as the values to select when that type is selected.
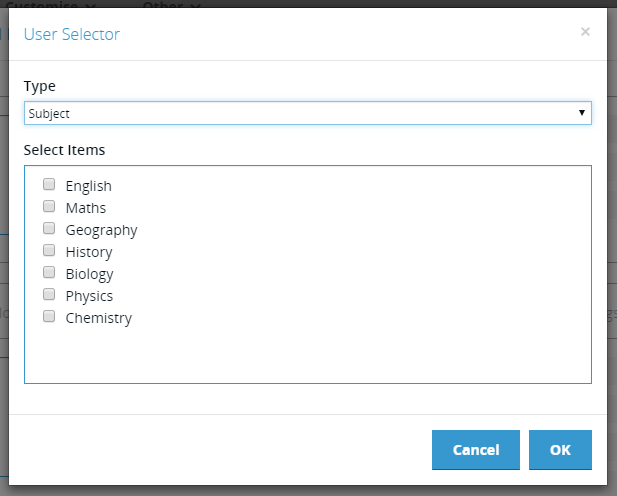
For example – here the user has selected ‘Subject’ and the list shows the different subjects defined in the picklist stored against the custom ‘Subject’ field. Selecting one or more of these values will select all users who have the ‘Subject’ field set to one of the selected values.
Permissions
Having selected a User Selector the Permissions and Catalogs section of the ACL Editor are populated with the Access Control Rule associated with the selected User Selector.

The Permissions section will be familiar to existing users of CatDV Server as they are the same as used by the normal Role/Group permissions.
The selected permissions are applicable to the users specified by the user selector and the catalogs specified by the catalog selectors (see below)
Catalog Selector Editor
There two types of Catalog Selectors:
Catalog – selects individual catalogs from the current catalog group
Rule – a rule that selects one or more catalogs from the current group based on specified criteria
Clicking Add Catalogs in the Catalogs section (or selecting an existing catalog selector and clicking Edit) opens the Catalogs Selector.
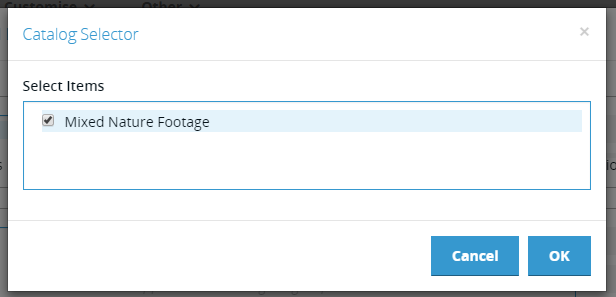
The list shows catalogs from the current group and one or more of these can be selected. The permissions defined by this Access Control Rule with then apply to those catalogs
Clicking Add Rule in the Catalogs section (or selecting an existing rule selector and clicking Edit) will open the Catalog Rule Selector:

A single catalog selector rule (there can be many in a single Access Control Rule) specifies the criteria that must be met for a catalog to be selected. It can be thought of as a simple query.
There are two elements to the rule:
Field – specifies the field on the catalog object that will be tested.
Value – the value that that field must have in order for the catalog to match.
Field
The Field drop down show the available catalog fields:
Currently only built-in fields are supported, but in future custom catalog fields will be added.
Value
The Value field is a free text field into which the value to be matched against is entered. It can contain a simple text value that must exactly match the selected catalog field, or it can contain a more complex expression that must evaluate to a value that matches the selected catalog field.
Wildcards
A wildcard (‘*’) matches any sequence of characters.
For example if the selected catalog field was ‘Catalog Name’ and the value was ‘Forms/*’ then the selector would match all catalogs whose name begins with ‘Forms/’.
In CatDV a catalog’s name may be a path name that is used by the UI to present the catalogs in a tree. Therefore this pattern matches all catalogs in the ‘Form’ folder.
User Field Expressions
The value field may also contain references to values from the User object that refer to the currently logged in user.
These expressions can refer either to build in fields – e.g.
${user.name} – the user’s name ${user.role} – the user’s Role
Or custom user-defined fields, such as those mentioned in the previous section – e.g.
${user[subject]} – the custom ‘subject’ field on the user object
By combining these features very powerful rules can be created.
NOTE: the full list of fields on the User object can be found in the Object Reference of the CatDV REST API documentation.
ACL Rule Example
Take the student scenario described earlier where the User object has a custom user-defined field called ‘subject’ defined on it that contains the subject the student is studying.
Imagine that we wish to restrict that student to only be able to access catalogs with the catalog folder that matches their subject and that those catalog all live in a catalog folder called ‘Forms’.
This could be achieved by selecting ‘Catalog’ (i.e. catalog name) as the field and then setting the value to:
Forms/${user[subject]}/*
That is – select all catalogs where the catalog name (path) starts with ‘Forms/’ followed by the student’s subject.
Full Audit Logging
CatDV Server already maintains an audit log that records many important user interactions, such as when a user logs on or off, when a catalog is updated etc. However Pegasus extends that by logging additional actions and details:
· Records the values of individual fields that have been changed when clips are created or updated.
· Records deletion events on individual clips when the containing catalog is deleted and records addition information such as media path of the deleted clips.
· Records when a clip has been viewed (in the web interface).
· Records when a clip has been played (in the web interface).
· Records searches that have been performed.
Also audit log records are now linked to the individual clips that were affected by the action, which allows a detailed audit history to be retrieved for individual clips.
This additional information is of particular value when creating business reports.
Setting up Extended Logging
To enable extended logging you must have a valid Pegasus Server licence. You also need to enable the feature by entering the following text into the ‘Other’ field in the Server Config screen in the CatDV Server Control Panel:
catdv.extendedLogging = true
You will then need to shut down CatDV Server.
Viewing the Audit Log
The Audit Log can now be viewed in the CatDV Web Admin UI in the Monitoring section.
Advanced Reporting Support
In addition to the simple built-in reporting engine, it is possible to implement reports in CatDV Server using any reporting tool that supports MySQL or JDBC. CatDV Pegasus Server provides specific support for reporting using the popular Eclipse BIRT system.
Setting up Reporting
Before starting you need to download the Eclipse BIRT software from:
We recommend downloading the all-in-one package that includes all necessary software components.
Creating a Data Source
The first task is to create a Data Source that will connect BIRT to CatDV. In the Data Explorer panel right click on the Data Sources node and select ‘New Data Source’. Choose ‘JDBC Database Connection for Query Builder’ and then ‘MySQL’ when prompted. The new database source dialog will then be displayed:
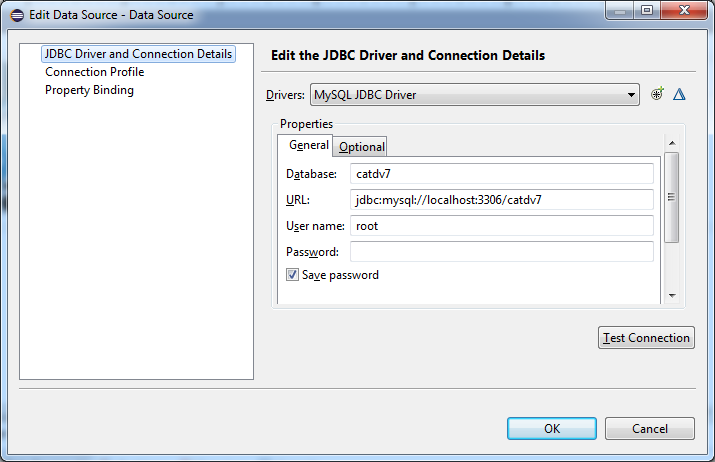
The JDBC data source connects directly CatDV Server’s MySQL database, so you need to enter the address of the server and an appropriate MySQL username and password (not CatDV username and password).
Creating a Data Set
The next task is to create a Data Set that will select a particular set of data from the Data Source created in the previous step. In the Data Explorer panel right click on the Data Sets node and select ‘New Data Set’. Select the Data Source created in the previous step from the list of Data Sources and enter a name for the new Data Set and click Next. This will open the Data Set Query Builder.
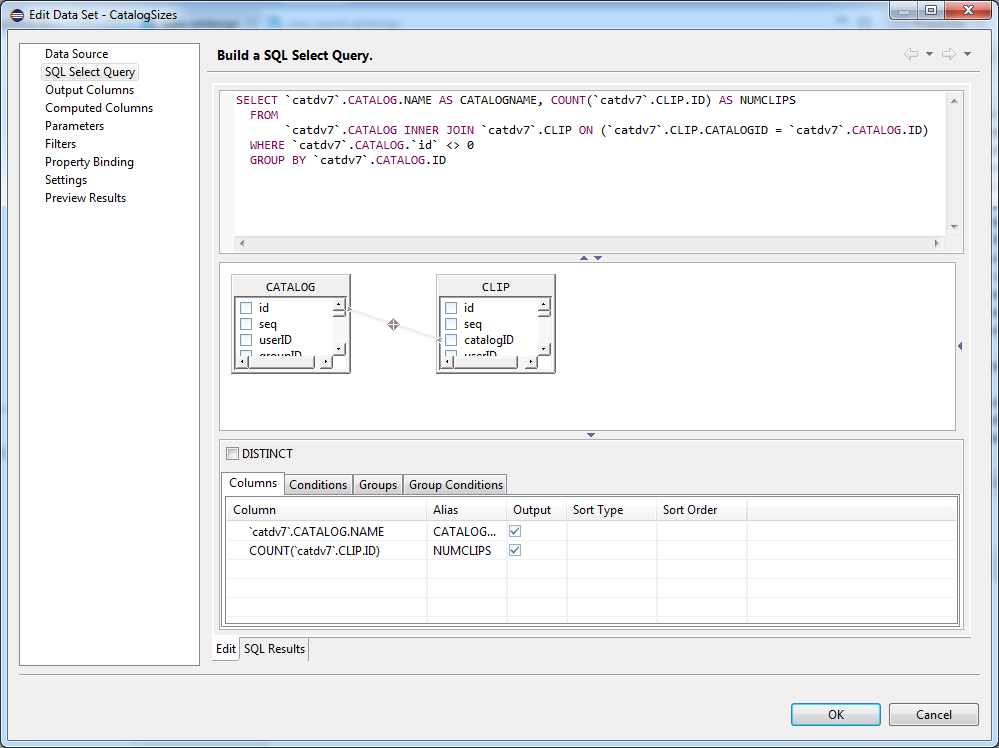
The Query Builder is a graphical SQL Query builder that allows you to easily build queries to select statistical information from the CatDV database.
Right clicking on the central pane allows you to select from any of CatDV’s database tables and bring them into the query diagram. When multiple tables are added, they can be linked together using primary key / foreign key relationships, which can be created by dragging from foreign key to primary key. CatDV uses a simple key naming convention whereby every table has a unique primary key called ‘id’ and every foreign key that references that table is called <table_name>ID. For example in the diagram above the foreign key in the Clip table that references the Catalog table is called ‘catalogID’.
Once you have constructed your query it is possible to preview the results by selecting ‘Preview Results’ from the navigation section on the left.
Building a Report
Once you have created a Data Source and one or more Data Sets you can create a report using the graphical Report Builder.
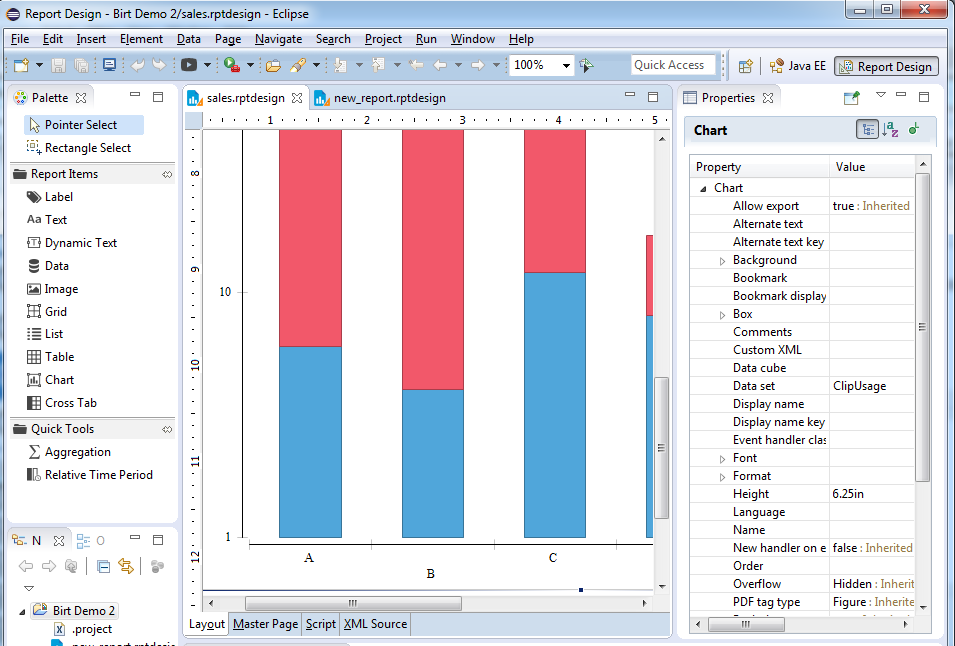
Report elements can be dragged on from the Palette on the left and then configured by selecting them in the report designer panel in the middle and editing their properties in the Properties panel on the right.
Previewing the Report
Once configured the report can be previewed in a web browser or saved out as a PDF or one of many other supported formats using the View Report menu.
For more complete documentation on BIRT’s capabilities please refer to Apache’s documentation which can be found here – http://www.eclipse.org/birt/documentation .