Advanced Configuration
LDAP Configuration
CatDV Server supports authentication of users against an LDAP server – either Active Directory (Windows) or Open Directory (Mac). Once configured users can log into CatDV Server (either using the desktop client application or Web Client) using their domain/workgroup account.
Configuring LDAP Authentication
To configure CatDV Server to use an LDAP authentication server go to the CatDV Server Control panel and click on the Server Config button, which will display the Edit Server Config screen. In this screen click on the LDAP tab as shown below:
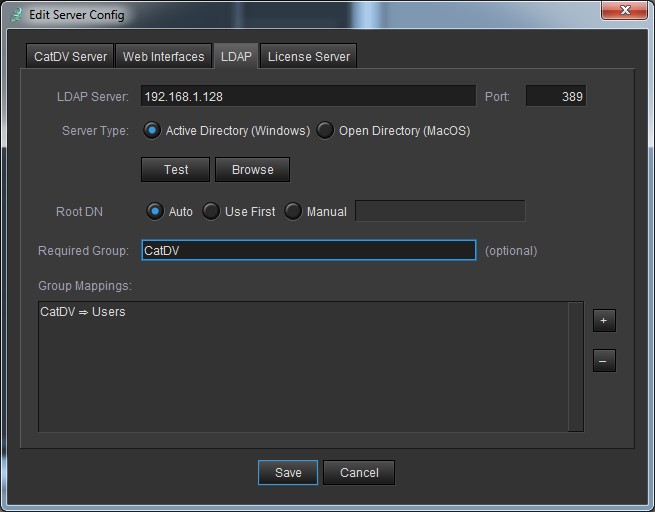
You need to provide the following information:
LDAP Server Address – This can be either an IP address or domain name of the LDAP server. This will typically be the Windows Domain Controller or Mac OS Server.
Port – The TCP port used to connect to the LDAP service. This should not need changing from its default value of 389.
Server Type – Specify whether your LDAP server is Active Directory (Windows) or Open Directory (Mac OS). Currently these are the only two supported options.
Required Group – If this field is filled in then only users that are member of the specified user group will be able to connect to CatDV.
Group Mappings – This table contains a list of mappings that map one or more user groups (defined in the LDAP directory) to CatDV roles. When a user logs in to CatDV using their Active Directory/Open Directory account the role that they are assigned will depend on the groups that they are a member of. Mappings are applied in the order they appear in this list. The first matching mapping determines the user’s role.
LDAP Group Mappings
The list of mappings can be managed using the + and – buttons to add and delete entries and by double-clicking on an entry to edit it. The edit screen is shown below:
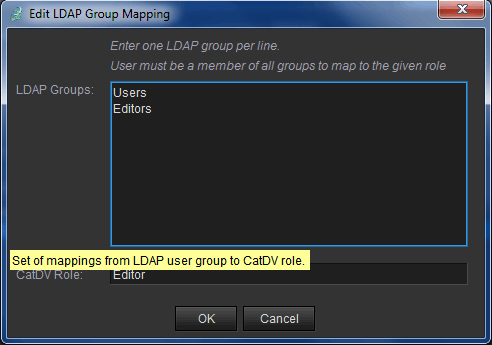
The LDAP groups field is a simple text field where each group is entered on a separate line. A user must, either directly or indirectly (through an intermediate group), be a member of all the listed groups before they are assigned to the CatDV Role given in the CatDV Role field.
Logging On using LDAP
To authenticate using Active Directory or Open Directory the user must enter an account name using the format username@domain. For example [email protected] (the older Active Directory DOMAIN\username format is ot supported).

CatDV uses the presence of the ‘@’ symbol to denote that an LDAP account is being used. Other than that the process is identical to connecting with a regular CatDV user account.
When the user logs in for the first time CatDV will create a CatDV user account that is linked to the LDAP account. This is used for auditing purposes only. The password and roles on this linked account are not used – they come from the LDAP directory.
Troubleshooting
The LDAP screen in the CatDV Control Panel includes a simple LDAP Browser function that can be useful to confirm that you can connect to you LDAP Server and also to check the exact names of the Groups as they appear to the CatDV.
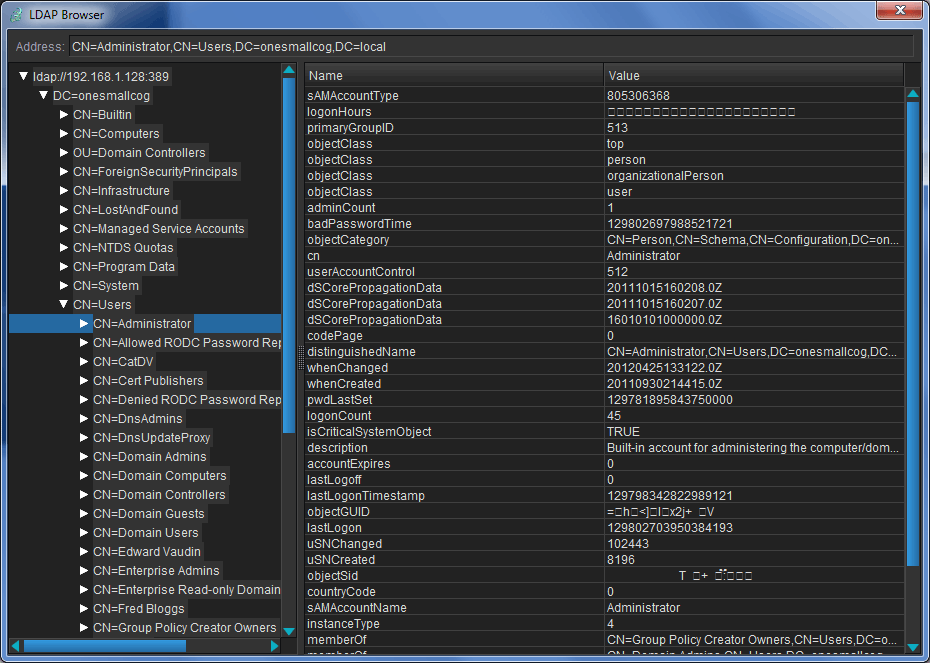
To launch the LDAP browser click on the Browse button on the LDAP screen. You will be prompted for your Windows credentials and you should then see the screen above. You may need specific permissions to browse the LDAP catalog depending on how your server is configured.
Login Problems
When connecting to Active Directory CatDV uses the userPrincipalName property of the LDAP User record to identify users. Usually this will contain the user’s email address, but that is not mandatory, so you may need to check what value userPrincipalName is actually set to and that will determine what name the user’s need to enter to log on.
Manual Configuration Editing
The operation of the server, including how many client connections are permitted, is controlled by a license key or registration code stored in the catdv.properties file. The easiest way to edit this file is using the CatDV Server Control Panel as described earlier. However, you can also edit the catdv.properties file manually if you prefer (or if you are using Linux and configuring the CatDV Server via the command line).
You will have been mailed four lines of text such as the following example. (Please contact [email protected] if you do not have your registration code.)
reg.user = Trial
reg.code = OGOP-JZXL-G1TD-65SI-7F7B-YZ3X-GVJD-6YQQ
reg.expires = Jun 30, 2005
reg.info = Workgroup Server for MySQL (5 clients) with Live HTML Publisher
Open the catdv.properties file in the CatDV server directory with a text editor (or better still, using the CatDV Control Panel), then copy and paste these lines in to the file, replacing the example lines included in the file as distributed.
This file also contains other configuration information, most notably the connection URL for the database. You need to make sure the value of catdv.database is correct for your database. Comment out or delete the mysql line editing it to include your secret password that you entered earlier.
The catdv.properties file also contains configuration for the Live HTML Publisher but you can safely ignore these lines if you do not use the HTML Publisher. If you make any changes to the catdv.properties configuration file you need to stop and restart the workgroup server for the changes to take effect.
CatDV server configuration parameters
There are two ways of specifying configuration parameters such as the database URL to use: via the catdv.properties file and by specifying a system property in the launchServer batch file with –Dproperty=value. You should avoid trying to set the same property in two different ways as that is likely to be confusing. For reference though, the system property setting takes precedence.
Normally you should use the CatDV Control Panel (see 3.6) to edit these settings and are unlikely ever to need to edit the catdv.properties file by hand. The following properties are used:
catdv.logfile | Filename of server log file to create |
catdv.properties | Filename of properties file to load |
catdv.rmiport | Server port to use (defaults to 1099) |
java.rmi.server.hostname | The server’s own IP address (if the machine has multiple network adapters you need to specify which IP address clients will use to connect to the CatDV Server) |
catdv.server | The RMI service name |
catdv.database | Database URL to use |
catdv.debug | Set to true (and restart the server) to display additional debug information in the server.log file |
catdv.allowAnonymous | Set to true if you are using Workgroup edition clients connecting to the Enterprise server and want to allow them to create and edit catalogs in the default system group without logging on to the server. |
catdv.terminationFile | Filename of a file which, if present, signals the server should terminate |
catdv.jdbc.class | Java class name of the the JDBC driver class |
reg.user | Registered user name (license details) |
reg.code | Registration code (license details) |
reg.info | Human-readable description of license (license details) |
reg.expiry | Human-readable description of license (license details) |
reg.webuser | Registered user name (if different from reg.user) for the WebClient software license |
reg.webcode | Registration code for the WebClient software license |
preview.dir | Filename of preview root directory (HTML Publisher) |
preview.url | Corresponding URL (HTML Publisher) |
media.dir | Filename of media root director (HTML Publisher) |
media.equiv | Equivalent media path prefix (HTML Publisher) |
media.url | Corresponding URL (HTML Publisher) |
timestamp.format | How dates and times are formatted (HTML Publisher) |
web.user | Which CatDV user the web publisher uses to access Enterprise server. Determines which catalogs will be accessible via web interface (HTML Publisher) |
catdv.fields | Which field set to use (Web Client) |
catdv.useRoles | Set to true when working with CatDV 9 Enterprise clients or false when using CatDV 8 clients. |
Advanced MySQL
MySQL replication
If you require, you set up replication from one MySQL instance to another, ensuring that you have a second copy of the database on another machine which is automatically kept in sync with the first.
This will involve editing your my.cnf or my.ini config file. Under Mac OS X you may need to create the /etc/my.cnf file first, see 3.2 above. Under Windows the file is called my.ini and is normally located in C:Program FilesMySQLMySQL Server 5.0. In both cases you should review the existing file and merge in the changes below.
1. On the master machine, edit your my.cnf or my.ini config file and add the following
[mysqld] log-bin=mysql-bin server-id=1
On the master, execute the following mysql command:
GRANT REPLICATION SLAVE ON *.* TO 'repl'@'%.mydomain.com' IDENTIFIED BY 'slavepass' ;
(You can change the replication user ‘repl’ and password ‘slavepass’ as required. Replace mydomain.com with your domain name.)
On the master, execute the following mysql command and note the file and position:
FLUSH TABLES WITH READ LOCK; SHOW MASTER STATUS;
On the slave machine, edit my.cnf/my.ini and add the following:
[mysqld] log-bin=mysql-bin server-id=2
(You can choose different server-id’s if necessary, the important thing is that the master and slave are different from each other.)
On the slave, execute the following mysql command:
CHANGE MASTER TO MASTER_HOST='hostname', MASTER_USER='repl', MASTER_PASSWORD='slavepass', MASTER_LOG_FILE='f
Replace hostname with the host of the master. Replace ‘slavepass’ (and ‘repl’ if necessary) with the user name and password you set up at step 2. Replace filename and filepos with the values you noted at step 3 (use ‘’ and 4 if not otherwise specified).
You can start and stop the slave and check its status using the following MySQL commands:
STOP SLAVE; START SLAVE; SHOW SLAVE STATUS;
Refer to the MySQL documentation for further details if required.
Tomcat Configuration
CatDV Server includes a built-in Tomcat Web Application Server. For most installations this is the recommended mechanism for serving the CatDV Web Client and the REST API. However, you may wish to host the web interface on a physically separate server to distribute the computation load.
Using an External Tomcat Server
Note: The Tomcat settings in the CatDV Server Control Panel are only relevant if you are still running a separate Tomcat instance on the same physical server as CatDV Server. This is a deprecated configuration and this section of the Control Panel is retained only for backwards compatibility.
If you want to use an instance of Tomcat running on a separate server then configuration of Tomcat must be performed manually.
To configure an external instance of Tomcat perform the following actions:
1. Copy the catdv.war files from the CatDV Server installation directory into the Tomcat webapps directory. Additionally, if you want to use the CatDV home page as the root page for the site then copy ROOT.war into Tomcat’s webapps directory. You should then restart Tomcat.
Note: If you are upgrading from a previous version of CatDV Server then you will need to remove or overwrite any existing war files that are already in the webapps directory.
2. In the Web Server tab of the CatDV Server Control Panel Setup Wizard you must ensure that the internal web server is disabled by choosing “None” in the “Enable Embedded Web Server” check box.
3. The Port field should be filled in with the port that your copy of Tomcat is using (usually 8080) so that the Control Panel can monitor the Tomcat instance.