
CatDV Worker Node 9.1
(incl. Pegasus Worker)
User Manual
Copyright (C) Square Box Systems Ltd. 2006-2023. All rights reserved.
Square Box Systems Ltd
The Lightbox Willoughby Rd Bracknell RG12 8FB United Kingdom
Restructured Documentation
The Worker Node documentation has now been restructured into separate release notes (updated with each point release) and user manual (this document, generally updated with major version updates only). The old Pegasus Worker addendum has also been merged into this user manual.
Please refer to WorkerReleaseNotes.html for a detailed list of changes in each release.
New Features in Worker 9.1
Worker 9.1 builds on Worker 9 and adds the following:
· Significant improvements to Avid AVB bin reader and AAF exporter so that virtually any file that can be imported or AMA-linked in Media Composer, including complex clips and image sequences, can be brought into CatDV and logged there, then re-exported to Avid where it will play and link to the the original clip (and come over with markers, log notes, subclips, and cuts-only sequences intact).
· A new DNx OpAtom MXF exporter (requires Pegasus Worker) allows raw camera media to be ingested into CatDV first and then exported as a DNxHD proxy to the Avid MediaFiles folder, including burnt in text or timecode if desired. Special AvidProxy metadata fields on the original clip describe the exported files, so when the clip is exported from CatDV via AAF Media Composer will automatically link to and play the proxy (and you can subsequently Re-link to the original hi-res in Avid later, as required).
· A new Image Sequence exporter allows movies to be transcoded to a sequence of consecutively numbered images in most common formats including JPG, EXR, DPX, PNG, TIF etc. (again, including burnt-in text if required).
· Improved codec support, including support for playing and transcoding CinemaDNG image sequences, updated FFmpeg, RED, BRAW and Avid libraries, and better GPU support.
· A new option to control whether any worker processes are held in reserve for urgent high priority tasks or not.
More generally, Worker 9 extends Worker 8.1’s focus on cloud workflows and allows worker processes to run as separate processes from the main worker engine and task list, potentially even on different machines in future.
A key technical difference between Worker 8 and 9 is that Worker 9 is built on the CatDV 14 codebase, which uses OpenJDK 11 and is fully 64-bit only, which means that it can be notarised to run on Mac OS Catalina and later.
Other significant changes include:
· Support for the new clip types such as playlists and version sets introduced in CatDV 14. Lightweight image sequences represent an entire directory containing an image sequence as a single clip rather than a metaclip and are and enabled by setting imageseq.lite=true. Similarly, lightweight directory clips represent a Mac package or bundle directory as a single clip rather than listing all the files within it. (By default ‘.app’, ‘.fcpbundle’ and ‘.framework’ are treated this way but you can override this list by setting package.exts).
· Quick folder scan has the ability to detect when an existing file has been moved and to update the existing clip record, and move any existing proxies, rather than creating a new clip. Similarly, it can detect when a file has been deleted, and automatically move clips to the ‘Deleted Files’ catalog
· Changes to make it easier to deploy the Worker in containers and VMs, including automatically registering with the server (for use in the Web Admin Worker Dashboard), allowing remote administration of a single worker without requiring a Pegasus Worker license, and improvements to the Pegasus Worker Manager so by default it gets its list of workers to administer when you connect to the server. Remote worker administration is now controlled by which the role of the CatDV user making the change.
· When monitoring a Quantum StorNext volume the Linux Worker will use metadata archive change notifcations so that a quick folder scan can more efficiently scan the volume and only process files and directories that have changed without needing to scan the entire directory tree. It still polls the metadata controller to ask it which files have changed but this is much more efficient and means the poll interval can be reduced (eg. to 10s).
· Usability improvents, including the ability to edit watch actions without pausing the threads while the worker is running, the ability to group related watch actions into sections and show dependencies between actions in the new graphical overview panel, and a new button to temporarily disable all watch actions other than the one you are working on and then restore the previous state when you have finished testing.
· Other changes such as adding Canon RAW and Avid DNx codecs, and loading metadata extraction naming rules from the server if they are defined there.
New features in Worker 8.1 and earlier
Worker 8.1 is a major update to the worker with a particular emphasis on cloud workflows with the following main changes:
· The ability to define “remote volumes” (with CURL, Amazon S3, and Backblaze B2 implementations) and then set up cloud ingest watch actions. These are similar to quick folder scan actions and monitor a remote volume or bucket to create clips that refer to a remote location by using a special media path that uses square brackets for the remote volume. You can then follow this with watch actions to analyse the media and build a proxy and it will automatically download the remote file to a temporary cache as required. (Pegasus Worker only)
· Remote volumes (file paths using square bracket notation) can also be specified as the destination for file copy or move operations and as the destination of a ‘build proxy’ step. (With CatDV Server 9.0 you can also specify remote volumes and use these in your media stores, including as the location of proxies and hi-res files for download).
· Support for containerisation. Using the Pegasus Worker Manager you can store worker “cloud” configurations in the CatDV Server database, and then to start up a worker instance you just specify environment variables that tell it how to connect to the server to fetch its configuration from the server (as instances don’t maintain persistent local state when they’re not running). The Linux worker is available as a prebuilt Docker container. (Pegasus Worker only)
· Use of web sockets and RMI over HTTP to simplify communication between the worker and server, and between the worker manager and the worker service, by only using standard HTTP ports rather than having to open up the network to allow RMI
· The Linux worker now includes the native helper process to support decoding of RED, ProRes, ARRI, and other formats.
· Other changes include adding Blackmagic BRAW support, adding multi-line conditional steps, and Javascript failAndRetry and submit() methods.
These are in addition to features introduced earlier in Worker 8.0:
· The native helper process has moved to 64-bit, so QuickTime (which has been deprecated by Apple) is no longer supported and legacy dependencies on QuickTime have been removed. The NativeQT exporter is no longer available and transcode jobs should be migrated to use the Advaced Exporter instead.
· The Advanced Exporter has been significantly enhanced, including adding support for using native AVFoundation or Media Foundation exporters, ability to generate Apple ProRes files (including 4444XQ) on MacOS, and support for creating special audio waveform movie or film strip image files.
· Pegasus Worker integrates with the third party Tin Man Studio application from Calibrated to allow export of OpAtom DNxHD files for use in Avid Media Composer.
· For improved performance server-queries can be triggered when a notification is received from the server that a clip has changed rather than by regularly polling the server. If you check only the “Trigger on notification” checkbox then if any field that is used in the trigger changes on the server then the query is run immediately (though not more often than the check interval). If you check both options then the query runs regularly at the poll interval but if a notification arrives it brings the time forward and runs it immediately.
· Similarly, if you allow file uploads through the CatDV Web Interface, and have a worker watch folder to process incoming files, then the worker action can be triggered immediately by a notification from the server rather than having to poll the watch folder.
· Bulk queries that move clips to another catalog are much more efficient (by not opening up the destination catalog before appending to it, and by not unnecessarily refreshing the catalog from the server after publishing changes).
· Group processing steps like sending final email or performing a command on completion of other processing steps under a new “Completion actions” section.
· Add a new “failure action” processing step that is triggered if a task fails. You can run a JavaScript and/or set a clip field when an error occurs, for example to say that there was a problem creating a proxy for that clip. (Depending on what the error is the failure action isn’t always guaranteed to run of course. For example, if the connection to the server went down then you won’t be able to set a clip status and publish changes!)
· Add a new “Apply Metadata Rules” processing step
· Add a new $! variable that displays the last error message, and $# that displays the current value of the task summary.
· If you have a Pegasus Worker license there is a new REST API that lets you remotely monitor the worker and submit jobs.
· When in development mode there is a new option to resume running normally (for the duration of this session) without having to edit the config to turn development mode on and off
· Support for loading path mappings from media stores stored on the server, avoiding the need to repeatedly define the same path mappings eg. from Mac to Windows paths or vice versa on each watch action. This applies both to path mappings to locate original media files and to locate Avid Media Files by UMID. You can still specify custom path mappings for each watch action and these will be checked before those from the server media stores. Note that when building proxies currently you still need to specify the destination root folder because there might be multiple potential matches and the worker needs to know where to put the proxies.
Worker 8 builds on the following major changes that were added in Worker 7.0:
· Worker 7.0 is built on the CatDV 12 code base and includes improvements to the core engine in CatDV 12, including better metadata extraction (from MPEG, JPEG, WAV and MOV files), an advanced FFmpeg-based exporter, support for automatically creating a .jpg proxy when building proxies from a still image, ability to use syntax like clip.name or media['FNumber'] in variable expressions, support for Sony XAVC-S and Canon XF-AVC metaclips, improved AAF and FCPXML support, ability to create audio waveform thumbnails from audio files, and support for XMLv2 and SRT sidecar files.
· Like CatDV 12, Worker 7.0 features a more modern flatter look and feel, and native support for the CatDV Server 7 metadata schema.
· Worker 7.0 is able to run without QuickTime being installed. If QuickTime is available it will be used, as it provides access to Apple ProRes and third party codecs such as from Avid and Calibrated, but if it isn’t installed the Worker can still process most files using its build in media file analysis and metadata extraction routines and transcoding capabilities provided by FFmpeg.
· As a result of reducing the worker’s dependency on QuickTime we are now able to offer a version of the worker that can run under various versions of Linux (to enable deployment on the cloud for example).
· The worker engine now runs as a separate process from the user interface. There are new buttons to explicitly start and stop the worker running. Editing the configuration no longer has to immediately apply the changes and restart the worker and it is possible to quit the worker user interface (i.e. the config editor and status/task list monitoring application) while leaving the core worker engine itself running as a background process.
· There is the option to store the task list using an embedded database rather than using the old xml file based format as this is more efficient and permits faster throughput.
· There is a new graphical configuration editor that displays a visual overview of all the watch definitions and processing steps. Different colours indicate the type of processing step, and “stacked” nodes indicate where a single watch action such as a server query can queue multiple separate tasks. Double click a node to edit the watch definition, then drag and drop available processing steps across to edit the watch action.
· The worker main window includes a new task summary panel that shows how many tasks completed or failed, without needing to keep the task list panel open to to monitor failed failed tasks. Additionally, it is possible to have multiple task list panels open with different task filters, and to undock or remove the task list from the main window.
· Enterprise and Pegasus Worker supports a new Execute Javascript processing step, and also supports plugin extensions (for example a File Path Cleaner or Upload To YouTube processing step) that can be purchased from our market place.
· It is possible to disable watch actions so they don’t run automatically, but instead run them manually from the Run Now menu, or with the new Run Watch Action processing step. This allows one watch action to trigger another watch action immediately without requiring polling.
· Better control over task priorities (lowest priority watch actions will only run and queue new tasks when the system is idle, and if you have three or more worker processes then at least one process is reserved for normal and high priority tasks only).
· New importer for Avid AVB bin files, including an AVB Folder Sync importer that watches a folder for new or modified bin files and only imports new clips.
· New Segment Exporter (based on FFmpeg) that automatically splits a transcode up into separate segments and then concatenates them. This allows things like spanned metaclips and complex sequences including metaclips to be transcoded, and means event marker text can be burnt in. It also allows exported movies to be preceded with an optional title slate, and provides more consistent handling of audio when transcoding files with different numbers of audio tracks and channels of audio per track, including a new option to mix down all the input audio tracks to a single output track.
· Ability to use cuvid and nvenc hardware acceleration if you have a Windows PC and a modern NVIDIA graphics card and are transcoding to H.264 or HEVC/H.265.
· Enterprise and Pegasus Worker can be installed as a background service that is started automatically when the system boots up, rather than having to be started manually in a logged in user session.
· If you have a Pegasus Worker license there is a new option on the server query panel to queue one task at a time to support worker farming. When the query runs, rather than queuing all the matching clips it will just queue the first one, and atomically update the status of the clip to say it has been queued. This allows workers running on different machines to fetch one task at a time from the server. Additionally, as soon as one task completes the query is automatically and immediately performed again (avoiding the need to keep running queries with an unnecessarily high poll rate).
Worker 6.1 is a major update to Worker 6.0 that:
· Increases the use of processing steps, by replacing the final copy/move/delete file step and the setting of clip fields on the Publish tab with processing steps, adding more flexibility and allowing the user interface to be simplified.
· Adds support for conditional processing by making each processing step conditional. Only those clips which meet a condition (those where a specified field matches a regular expression pattern) will be processed by that step, and if no clips match then that step will be skipped entirely. Taken together with server query triggered tasks and the Test File Existence processing step this allows a great deal of flexibility when developing worker scripts.
· Adds a new option to resume the worker after a few minutes if a server error occurs (normally unexpected server errors cause the worker to pause, allowing you time to resolve the problem manually, but you may want to select this option for unattended processing).
· Adds support for limiting the number of files that will be processed at a time in one quick folder scan or bulk server query step.
· Adds support for camera card manifests to ensure that a complete camera card is copied or archived when dealing with complex clips (P2, XDCAM, XF, XAVC, AVCHD, etc.). Additionally, the media path for metaclips is shortened and made more consistent so it doesn’t include unnecessary path components like BPAV/CLPR or CONTENTS.
· Allows array syntax to pull out parts of a file name in variable expressions.
· Supports rotation of worker log files (by default a new log file is created once per day or when the log file gets over 40MB in size, or when you reinitialise the worker, and the five most recent files are kept).
· Add support for importing and transcoding DPX and EXR image sequences.
· Add support for transcoding from any supported media format to any other via intermediate image sequences (for example, from RED or AVCHD directly to QuickTime ProRes).
· Improvements to file preprocessing, with explicit control over whether to copy then delete files to move them across file systems, and options on how to deal with error conditions. (Use the copy/move directory command to cope with complex media types and the regular copy/move file command for normal files.)
Worker 6.0 adds the following main features:
· The main change architecturally is that Worker 6 has been updated to work the same way as CatDV 11. The application now runs 64-bit for improved performance and memory handling and uses the new native helper process for import and transcoding of files (instead of the older QuickTime for Java technology). It also comes bundled with Java. These changes ensure compatibility with newer system software such as Mac OS X Yosemite.
· Worker 6 provides access to the new Native QT and FFmpeg transcoders of CatDV 11 (replacing the old 32-bit Xuggle, DSJ, and QTJava technologies which are now obsolete)
· There is a new CatDV XML v2 file format for importing and exporting clips which provides full access to the CatDV data model, including sequences, metaclips, event markers, metadata fields, thumbnails, and more. It is possible to update selected fields of existing clips via XML, as well as inserting new clips (both online and offline), and to automatically delete existing clips if required. The old CatDV XML batch file format continues to be supported.
· The ‘Conversions’ tab has a new panel where any number of processing steps can be added, replacing the fixed command execution and XML export fields. This provides a lot of additional flexibility and allows related files to be copied or moved, multiple commands to be executed, etc. Movie Conversions (proxy generation, and exporting stills and standalone movies) use this mechanism too, allowing conversions and other types of processing steps to be intermingled as required. Existing Worker 5 scripts are automatically converted to use the new processing steps (and a backup copy of the old worker script is kept).
· Similarly, there is a new batch export panel to export all the clips returned by a server query in different formats including AAF, ALE, EDL, CDV catalogs, and FCP7, FCPX or CatDV XML formats, and also to execute an external command on the exported clips.
· Improvements to Quick Folder Scan and the ability to test whether files original media or proxy files exist make it easier to keep catalogs and disk folders in sync and perform conditional actions if certain files are present or missing.
· There is a new ‘scheduled job’ trigger type for performing actions such as a database backup at specified times. The user interface for defining watch actions has been updated to expand the description of different trigger types.
· Metadata extraction rules can be applied to automatically populate metadata fields based on file naming conventions when importing a media file.
· The task list viewer in the main window has various options to filter the tasks based on their status or by searching for text in the file path or task summary.
· It is possible to hide watch actions which are no longer being used but which you don’t want to delete yet.
· ‘Allow polling’ has been changed to ‘remember completed tasks’ and the sense of this flag has been inverted. Wherever possible you should write watch actions so they remove the trigger condition once the task has been completed (change the status of a clip so it isn’t returned by the server query again, move a file out of the watch folder once it has been processed, etc.) and you don’t rely on the worker remembering completed tasks as this is much more efficient.
· It is possible to import and export individual watch actions and conversion presets, making it easier for systems integrators to provide and install customised scripts for particular tasks. These are saved as an XML file with extension .catdv which can be dragged into the worker node window to install it.
· There is a new job description field for adding optional notes about what a watch action does, and an optional worker name field to help identify which worker is which if you have multiple instances.
· There is a new field chooser when building server queries and setting metadata fields which allows you to type in the id of an arbitrary “blue” metadata field that might not appear in the list, eg. @ExifVersion.
· There is a new wizard to help you configure the destination path for a file export or move operation, including a regular expression previewer that will evaluate and display the value of an expression as you make changes.
· There is a new wizard to help with configuring command lines, including the ability to pick files for each individual argument and built-in templates for common actions such as Episode transcoding or MySQL backups.
· There is a new ‘Dump Variables’ processing step to help with debugging worker scripts.
CatDV Worker 5.1 builds on Worker 5.0 and provides additional flexibilty in terms of the types of work action that are supported, in particular for dealing with large numbers of clips in one operation:
· If you don’t need to perform slow operations like transcoding or thumbnail extraction on each file it is now possible to do batch operations such as a bulk server query and update or importing an entire folder of files in one operation
· A new ‘re-analyse media’ action allows basic stub clips to be created in the database first and then the detailed media file analysis and thumbnail extraction to be performed later (either once the file is available, or based on a server query)
· Ability to batch import clips from a CatDV XML Batch File even if the media files are not available, providing an easy way for external systems to insert clips into the database
· Other new features such as RED metaclips, automatic calculation of MD5 checksums, support for preserving P2 and XDCAM folder structures when copying and moving files, and improved handling of Unicode characters have also been added since Worker 5.0. See the Release History below for a detailed list of changes.
The following features were added in CatDV Worker 5.0:
· New framework for working with additional media libraries (such as JMF or Xuggle, rather than just QuickTime) for both importing and transcoding media files
· Improved QuickTime exporter and rewritten settings dialog, including ability to set QuickTime annotations, burn in text using complex variable expressions, override the reel name when adding a QT timecode track, better control over specifying the frame size, and set the background colour when burning in text or timecode.
· New Xuggle exporter, giving access to additional import and export formats, including the ability to deinterlace the video by line doubling and burn in text or timecode
· New DSJ exporter (Windows only) giving access to Windows Media and DirectShow codecs. (Note: on Windows 2008 Server it may be necessary to enable the “Desktop Experience” feature via Manage Computer to provide access to the DirectShow/Windows Media libraries.)
· Update the processing engine from CatDV 8 to CatDV 9/10 code base, so that changes made since CatDV 8.1.12 are now included (and ensure they continue to stay up to date in future). This includes changes such as being able to select the Xuggle or JMF importers (if installed), support for reading IPTC metadata, and improved metaclip support.
· Ability to run the task processor in a separate process, protecting against the possibility of crashes on particular media files. (Note that running in a separate process is not supported under Windows XP and requires Vista or later.)
· Support for exporting all the clips that match a server query to HTML or XML as a single batch, rather than separately for each clip.
· Simplify the worker by removing the ability to define more than one work set.
· Instead, allow for multiple worker processes to run concurrently for increased throughput (note that each worker will require its own license). Tasks can be assigned a timeout value and will be terminated after that time or if the external processor stops responding.
· Allow scheduling of tasks so they only run on certain days of the week or certain times of the day. This affects both when new jobs are created (via a watch folder or by running a server query) and when previously queued jobs are permitted to run.
· Incorporate the task list in the main window
· Remove the “pending” task state. Clips are published to the server immediately rather than being batched up. Additionally, appending to an existing catalog is more efficient as the worker no longer opens the catalog by loading existing clips from the server simply in order to append to the catalog.
· More logical arrangement of the user interface for defining a watch action, with changes to the post-processing and trigger tabs
· Increased number of extra fields that can be set on a clip
· The Windows version now comes with an .exe installer
· Ability to restrict watch folder actions to known file types such as common media files or P2 folder structures, based on the file name and extension
· New development mode to speed up testing by reducing poll and settle periods to 10s and prompting for confirmation before starting each task
· New “Slate” look and feel (this can be turned off if necessary on the General config page)
· The worker.xml file and default workset location (though you can change the latter if required) have moved from your home directory to the application data directory. After migrating to Worker 5 you can remove the old worker files to avoid cluttering your home directory.
These are in addition to the following features which were added in Worker 4.0:
· Support for unlimited server query terms
· Improved management of watch definitions, including a new ‘test’ button for watch folders and server queries and the ability to ‘solo’ individual actions by shift-clicking the Enabled button
· Support for media path mapping
· Improved handling of jobs submitted via XML batch files
· New options to use time of day timecode, add watermarks, and perform two-pass transcoding to add a second audio track with different settings
· Support for loading user-defined field names from the server
· Ability to specify separate emails for success and failure notifications
· Ability to perform processing on completion of an xml or server triggered batch
· Support for regular expressions to modify variable values
· A major new command line interface to generate reports or perform updates on the database for use within external scripts.
Detailed Version History
For detailed release notes please see the separate WorkerReadMe.html document.
Overview
The CatDV Worker Node is an automated version of the media processing engine found in the CatDV Pro application. It has two main components, the file watcher that watches one or more watch folders looking for new files to process, and the worker, a background thread which waits for and then processes the next available item from a queue of tasks.
The worker node must be configured to define which watch folders it monitors, what operation(s) to perform on these files, and how to access the CatDV server.
To configure the worker you specify:
· common definitions, such as the host name of the CatDV Workgroup or Enterprise Server, or details of an SMTP server for sending email notifications
· the location of the task queue file that the file watchers will add items to and the worker thread will remove items from as it processes them
· a definition of how items are added to the queue, ie. which folder to watch and any filter conditions that the file must fulfil to be processed (such as its filename matching a particular pattern, or it containing media in a particular format)
· a definition of what operations to apply to matching files.
Supported operations that can be performed include the following:
· analyse the file to extract technical metadata such as the video and audio format, sample rate, timecode etc.
· perform automatic scene detection to create separate clips for each scene
· create a CatDV preview movie from the media, or convert it to another format using an arbitrary QuickTime exporter and codec
· publish the clips (ie. details of the file and any scenes that were detected) to the CatDV server
· generate or update an HTML index page listing the processed clips
· send an email notification to selected users notifying them of the new file(s)
· execute an arbitrary operating system command, such as uploading the files to an FTP server, running a shell script or batch file, or anything else.
· move or delete the original media file once it has been processed or converted
The combination of a watch folder, filter condition and job definition is known as a “watch action”. You can define as many watch actions as you want, all with different filter conditions, to automatically process different kinds of file in different ways.
The combination of a task queue file plus a set of watch actions that will cause items to be added to the queue is known as a “work set”. The work set represents a queue of tasks to be performed (or that have already been performed recently).
Quick Start Guide
This section provides a quick tutorial, covering the basic steps you need to go through to start using the worker node:
1. Launch the CatDV Worker Node application. It should automatically bring up the Edit Configuration window, otherwise press the Edit Config button.
2. Go to the “License” tab and enter your registration code. (To do this, select and copy the entire contents of the email message you were sent then simply press the Paste button.)
3. If you use the CatDV Workgroup or Enterprise server, enter the server hostname and other details under the “CatDV Server” tab. (If you use the Enterprise edition of the server you should create a special user for the worker node to use and enter the username here.)
4. If you want to send email notifications you need to enter details of the SMTP mail server you wish to use under the “Email Setup” tab.
5. Go to the “Watch Actions” tab and click the “+” button to define a new watch action.
6. First, define what files the action applies to. It can be triggered by a file occurring inside a particular watch folder or by dropping a file into the Worker Node application window, and it may be restricted so it only applies to files that meet certain filter conditions. For example, you could enter “*.mov” as a filename pattern, or “44.1” in the audio format field. (Alternatively, you can define a server query and clips that have been saved to the server will be processed instead, for example whose status is “Publish via FTP”.)
If you don’t want to check a particular condition just leave the fields you’re not interested in blank to indicate “don’t care”.
7. Then, define what actions you want to apply to the matching files. Enter a job name to describe the action (eg. “Convert audio to 48 kHz”) and complete other fields under Job Details and Post-Processing as required. Many of the operations correspond to commands in the CatDV application. Analysing media corresponds to importing a media file and generating clips, movie conversions correspond to the Export As Movie and Build Preview Movies commands, and so on.
8. Press the “+” button on the Job Details tab to define as many movie conversions as you want. A single input file might be processed to create multiple versions at different resolutions for example. For the format, choose New Conversion Preset, give it a descriptive name then select which exporter to use and press Customise to adjust its settings. You can also choose a preset you have previously defined.
9. Repeat steps 6 through 9 as required to define as many different watch actions as required, or use the “Duplicate” button to use an existing watch action as a template and then edit the copy.
10. When you are finished, press Apply to re-initialise the worker node with the new settings and start processing files.
If you specified one or more watch folders they will be scanned initially after a short delay, and then repeatedly after the period that you configured. Alternatively, if you enabled file dropping, then you can drag and drop files from the Mac OS X Finder or Windows File Explorer into the main Task Queue area to submit them for processing.
User Interface
When you launch the worker node application it displays its main window, which summarises the current status of the worker and has commands to let you edit the configuration, display the detailed status of a particular task, and view the log file.
On the Mac the worker node continues to run in the background even when the main window is closed. Under Windows it terminates when you close the window.
Three distinct processes run concurrently and independently in the worker node, the File Watcher (which periodically scans the watch folder(s) looking for new files), the Server Watcher (which performs queries against the server looking for clips that are flagged for processing), and the Worker itself (which fetches tasks from the task list and performs them). The main window has check boxes which you can use to enable or disable these processes and also displays what they are currently doing.
Task Queue
At the heart of the worker node operation is the task list, a combined queue of tasks waiting to be performed and list of tasks that have already completed. Each task represents a clip or file that needs to be processed and a job to be applied to it.
The main window shows your current tasks in a table, with one task per row, whether completed or queued waiting to run. Each task has details of the input file and the job to be applied to it, together with information such as when the status was last updated, when the file was last seen (for example, if it the file is on a removable or network volume and is currently offline), or whether the task entry was created by the current running instance of the worker node or not (either because the software has been restarted or because another instance on another machine is using the same work file).
A task can be in one of several different states:
Queued When a new file appears in one of the watch folders a new task is created and queued. When the worker runs it will start executing the first available task whose status is ‘queued’.
Running This means the task is currently being executed. Note that several worker nodes on different machines could be working on the same task list, so it’s not necessarily being executed by the instance on this machine. (In practice though, if the instance is not the current one the most likely explanation is that an earlier instance was terminated prematurely and the worker node software has been restarted.)
Failed The task has completed but an error occurred. See the Information field for further details. If you correct the problem (eg. by starting the workgroup server, if it was previously down) you can resubmit the task so it is performed again.
Complete The task has successfully completed
Hold If you want to temporarily defer tasks (for example, to allow tasks that were queued later to be executed first) you can mark them as being on hold.
Offline This status is similar to tasks being on Hold. Tasks that were previously queued are automatically set to Offline when the worker node starts up if the file they relate to is no longer available (for example, because a server volume is temporarily offline).
Skipped Some jobs (such as importing an image sequence or a P2 metaclip) process multiple files in one go. If a file was queued for processing but has already been processed by another job it is marked as Skipped.
Retry The task has failed due to a transient error such as a network resource being unavailable and stays in the queue to retry after a progressively increasing delay. This state is entered via Javascript.
You can resubmit failed tasks (for example, after restarting the CatDV server), hold or resume tasks, or delete tasks using the relevant buttons at the bottom of the task list.
Tasks have a priority which affect the order in which they are done. The job definition defines a default priority but you can adjust the priority of specific tasks in the queue if you want to bring one forward.
Tasks are normally hidden after 3 days (unless you check the Show All box) and deleted altogether after 14 days.
Configuring the Worker Node
When you first launch the worker node software a message will be displayed because you don’t have a valid configuration. Press the Edit Config button to edit the settings. You will be taken through various screens and tabs for the different parts of the configuration:
General settings
Under the General tab you can choose your preferred format for displaying dates and times. You also specify how catalogs which are auto published to the server are named.
You need to enter a valid worker node license by entering the user name and activation code under the License tab. The easiest way to do this is select the email message you were sent (contact [email protected] if you don't have a copy), copy the entire text, then press the Paste License button.
Under the CatDV Server tab are settings that relate to the CatDV Workgroup or Enterprise Server. To automatically publish clips to the server you need to enter the server name (and optional port number) in the Server URL field.
If you are using the CatDV Enterprise Server enter the user name, password and group name (available from the CatDV Server Admin panel) that you want to own any catalogs that are automatically published by the worker node.
So that the correct names for user-defined fields are shown when defining server queries or settings clip fields, if you are using the Enterprise server you can enter the name of the field definition set you are using and press the Connect (or Re-Connect) button to load those field names from the server.
Publish Interval defines how long to wait before a clip is published to the server. Using this setting allows several files to be batched up and published in one go, which is more efficient but introduces some latency before other machines on the network will see the files.
To send email notifications whenever a file has been processed you need to have access to an SMTP server that will accept messages sent from the worker node. Under the Email Setup tab enter the server hostname, the From address that should appear in the message and a default subject (you can specify different subjects in different watch actions). You can also enter a user name and password if the server requires authentication.
In the same way as publishing clips to the server can be batched, email notifications are also batched so no more than one message is sent in a given period. You specify the recipients for normal notifications as part of each specific watch action definition, but if an error occurs (for example, an error connecting to the CatDV server) you can enter the email address of the administrator user(s) to be notifed.
The configuration needs at least one work set definition to be valid. You define work sets and watch actions under the Watch Actions tab.
Creating work sets and watch actions
In the current version of the worker you can only have a single work set. The work set includes the name of a task list file. This file is important as it contains the queue of tasks, both completed and currently running, and other information. In most cases you can use the default task list file but if necessary you can specify a different task location by clicking on the name to display a file chooser. The file name you choose should have extension .xml.
If you will run the worker node under your user account a good place for the task list file is in your own home directory, as you will need read and write access to both the file and the directory that contains it.
You can define any number of watch actions in your work set, each of which defines a watch folder and tasks to be performed on any matching file that appears in the watch folder. Press the ‘+’ button to add a new watch action or use ‘Duplicate’ to copy an existing watch action (you can then edit the copy without having to enter common settings again).
Editing watch actions
A watch action has two distinct parts. A definition of which clips or files should be processed (based on conditions such as where they are or what type they are) and a definition of what operation(s) should be applied to those files.
An action can be triggered based either on files appearing in a watch folder (or being dragged onto the worker icon), or based on clips saved to the CatDV server that match particular query conditions. If an action is triggered by the appearance of a file it must first be imported using one of CatDV’s importers (for example, analysing the file using QuickTime to extract metadata such as the file format, duration, timecode, etc.) whereas for a server-triggered action the clips have already been imported (either from a CatDV client or perhaps by another worker task) and so the file pre-processing and import stage is omitted.
The ‘General’ tab defines the name of the job, its relative priority, whether to send an email notification on completion of the job, and whether the job is triggered by a file or by a server query.
For file-triggered tasks, the ‘Trigger’ and ‘Conditions’ tab define the files to be processed, while the ‘Pre-processing’, ‘Conversions’ and ‘Post-Processing’ tabs define the actions that will be performed. For server-triggered tasks a ‘Server Query’ tab defines the query used to select clips for processing, while the ‘Conversions’ and ‘Post-Processing’ tabs are as before.
File-triggered tasks
The ‘Trigger’ tab defines whether files are processed because they appear in a watch folder or when they are drag and dropped. The ‘Conditions’ tab defines various filter conditions that the file must match for this watch action to be performed. Finally, the ‘Job Details’ and ‘Post-Processing’ To use watch folders the root watch folder must be specified. You can choose whether to only analyse files that appear in the watch folder or recursively in any subdirectory.
Alternatively, you can also enable drag and dropping of files directly onto the worker node application window. You must enable either the watch folder or dropping files (or both) or the watch action won’t be active (though there may be situations where it’s useful to disable a watch folder so it isn’t scanned without having to delete the entire watch action definition).
To avoid processing a file while it is still being captured or copied a settle period can be defined. Files are ignored if they are less than a given number of seconds old. The check interval defines how often the watch folder is scanned. Increase this period if you are recursively large directories on a slow external volume. (These fields can be left blank to use their default values).
Watch conditions
If you want to limit the processing to files of a particular type you can do so by setting various filter conditions.
The simplest and most efficient test is to only include files whose name matches a particular pattern, or which does not match the ‘exclude’ pattern. The filters can either be simple patterns, such as ‘*.mov’ or a complex regular expression such as ‘/[A-Za-z]+\.mp4$’ if the regex box is checked. Case is normally ignored when matching these patterns.
Other tests involve analysing the file by trying to open it as a media file (using QuickTime). You can choose one of various basic types (eg. QuickTime movie, AVI movie, MPEG movie, Still image, Non media file) from the drop down, or for media files add additional criteria based on the movie duration in seconds, the audio and video format, or testing for arbitrary track types.
In each case, you can check for the presence or absence of a particular property, and if you leave a field blank the condition will not be checked.
For video and audio tracks a description of the format (like the Video and Audio fields of CatDV) is checked for the presence of the text you type in. For example, Video might say “Photo – JPEG (480x320 30.0fps)” while the Audio description might be “MPEG Layer-3 Audio (44.1 kHz, stereo, 16 bit). Any substring will match, so you could type “JPEG” or “30.0fps” or “Photo – JPEG (480x320” in a condition.
To test for the presence of arbitrary track types, enter the type and subtype codes as displayed in the QT Tracks field of CatDV.
Pre-processing
You can pre-process files by moving or renaming them (including changing the file extension or Mac file type/creator) prior to importing or converting the files, for example to give files a unique name early on in the process if they would otherwise be known as something generic like C0001.MXF or IMG0001.JPG. It can also be useful when dealing with long filenames or those containing accented characters, which can cause problems in QuickTime under Windows.
There are several renaming options available. The file can be named by concatenating the folder and file name, by using a timestamp based on the current date and time, or by moving files to a destination folder and numbering the files consecutively so they get a unique name that doesn’t clash with files already there.
The naming drop down is used to specify both the destination folder (when moving files) and the file name. Some combinations are not permitted, for example “Rename file” and “Use enclosing folder”, as the latter is used when moving a file to another folder but keeping the original filename, and the former is used when renaming a file but leaving it in its original folder. See “How file naming works” below for further details.
The destination field is used both to specify the destination folder (when copying or moving a file) and to enter the filename pattern when expanding variables. These can be combined, for example you could specify a destination of “/MediaArchive/$Q_$1_$2$e” and then pass in a file called “/Volumes/XYZ/A001/A001_B02_1234_HI.MOV” to give “/MediaArchive /XYZ_A001_B02.MOV”
Most pre-processing operations refer to a single file but when dealing with things like P2 volumes you can copy or move the entire enclosing folder structure when the action is triggered. You need to specify a root folder (see below) and it’s the top level folder within the root that will be moved. For example, if the action is triggered by a file “/Folder/Subfolder/File1.mov” within “/Root” then /Root/Folder (and all its contents) will be copied or moved.
Importing media files
After pre-processing, the file needs to be “imported” to extract technical metadata (including its duration, format, timecode, and the tape name, if present in a timecode track) and create a clip record before you can transcode it to another format or publish it to the server. Optionally, scene detection is performed, using either DV-based start/stop recording information or visiual scene analysis, to create separate subclips. A separate thumbnail image for each clip is created of the specified size.
The following importers are available:
AVI/WAV File This uses CatDV’s built in parser for AVI and WAV files
Avid AAF File Import one or more clips from an Advanced Authoring Format file
Avid AVB File Perform a one-off import of the contents of an Avid Bin file
Avid AVB Folder Sync Process bin files whenever they change and check for existing clips on the server based on UMID, then either update the existing clip or import as a new clip.
CatDV Catalog (Quick) Open a .cdv catalog file, with the option to replace an existing catalog on the server in its entirety (may be used to sync catalogs from one machine to another)
CatDV XML File Import a CatDV v1 or v2 XML file
FFmpeg Media Import arbitrary video, still or audio media files using FFmpeg
Final Cut XML File Import contents of an FCP7 or FCPX XML file
Folder Clip Import a subdirectory of the watch folder as a generic directory clip without processing its contents.
Generic File This imports a file as a non-media file with a generic icon and no analysis of the media format (such as duration)
Image Sequence If a folder contains consecutively numbered still images the worker can import these as a single image sequence clip.
Java Image Import still images using Java ImageIO and TwelveMonkeys library
JQT MOV/MP4 This uses CatDV’s built in parser for MOV and MP4 files
MPEG Media This uses CatDV’s built in MPEG parser to determine technical metadata for MPEG-1 and MPEG-2 program and transport streams
MXF File This uses CatDV’s built in MXF parser
P2 Metaclip This uses CatDV’s built-in MXF parser and processes all the related files for a P2 clip in one go (video, audio and clip xml details are all stored in separate files but the P2 importer creates a single ‘metaclip’ that represents the clip as a whole)
PDF Document This uses CatDV’s built-in PDF parser
R3D File This uses CatDV’s built-in parser to read metadata from a single RED .r3d file
RED Metaclip Import a RED clip, creating a single metaclip that includes multiple spanned .r3d files and associated files such as reference movies in the same folder
TIFF/RAW Image Import still camera raw files (eg. CR2, DNG, NEF, MOS etc.) and TIFF images
WMV/ASF File This uses CatDV’s built-in parser for Windows Media files.
XDCAM Metaclip Import XDCAM, XDCAM EX and XDCAM HD folder structures and create a single ‘metaclip’ that wraps up all the files associated with a clip
In most cases you can use the “Automatic” setting to automatically determine the correct importer to use for common media file types.
If you choose the “Import all files” option then other types of file that the worker doesn’t know about are imported as generic files. Additional, if a known file type is corrupt and importing it normally gives an error, the worker will fall back to importing it as a generic file.
If you choose the “Interpret batch files” option then the contents of known batch and log files (with extension .cmx, .edl, .ale, .txt, .tsv, .xml, .srt, .tab, .dmp, and .fcpxml) are parsed using the corresponding CatDV importer (eg. the CatDV Pro “Import As Tab-Separated Text” command). This can result in many clips being produced (one per entry in the batch file), including offline clips.
If you choose the create MXF Metaclips “Based on folder structure” or “Based on MXF UMID” option then Avid, P2, XDCAM and similar formats where one clip can consist of separate files will result in one “metaclip” rather than separate individual clips in your catalog.
To create a clip per file you should therefore check the “Import all files” option, uncheck “Interpret batch files” and choose the “Don’t create metaclips” option.
In most cases you should choose “Based on folder structure” rather than “Based on MXF UMID” as this is more efficient, and gives more consistent results when running with multiple worker processes. You should only choose the MXF UMID option if you are working with Avid MXF files or need to merge spanned P2 clips into a single metaclip.
Automatically keeping catalogs in sync with a disk or folder
A common use of the worker is to automatically catalog an entire volume or folder and keep the catalog up to date as new files are added. To do this efficiently and provide more flexibility and control over the process this is normally done by breaking it down into a number of related tasks:
i) Use Quick Folder Scan to quickly scan the volume and create generic stub clips for each file, permitting files to be accessed or archived via CatDV as soon as they appear on disk. Set a clip status field to ‘Awaiting analysis’.
ii) Perform a server query to search for files of status ‘Awaiting analysis’ and perform media analysis on these to extract thumbnails and technical metadata. This will add each file to the task queue for separate processing but can run as a low priority background task. On completion, update the status to ‘Analysed’.
iii) Use another server query task to transcode the files and create proxy versions as required, either automatically (perhaps all video clips) or manually (based on the user selecting the clips they want proxies for within CatDV and ticking a checkbox to say ‘Create proxy’). On completion set the status to say ‘Proxy created’.
iv) Finally, you can have a bulk server query that tests whether all the files listed in the catalog are still available online and/or whether proxy files exist, and can update other clip fields to say ‘Original file exists’ and ‘Proxy file exists’.
v) To detect when files have been deleted and then remove the corresponding clip use the ‘Detect file deletes’ quick folder scan option (see below).
These steps can be combined if required, for example combining ii) and iii) to create proxies at the same time as the files are analysed.
Unless the volume or folder being monitored is very small you may want to place clips into different catalogs based on the folder hierarchy. For example, if you have a watch folder on /Volumes/SAN and files are organised into a hiearchy based on customer name and project number then you might want to create a separate catalog for each project. The $P variable contains the path of each file relative to the watch folder root but as the project may contain subfolders we want to use the first two components of $P as the catalog name. We can do this using regular expressions, first to convert Windows paths to Unix-style paths if necessary then pull out the first two groups of characters between a forward slash. /[^/]+/ matches a / followed by one or more non-/ characters followed by another /. The Quick Folder Scan action might therefore publish to catalog name:
SAN$P{s,\\,/,g}{s,(^/[^/]+/[^/]+)/.*,$1}
Even easier, the following will do the same thing, as Windows backslashes are now automatic converted to forward slashes in a catalog name:
SAN/$P[1..2]
When checking whether clips are still online at step iv) we can search for clips where the catalog name starts with “SAN”.
(You might also want further statuses such as ‘Ready for logging’ and ‘Logged’ and move clips or files to another catalog or library location once they are logged, but this depends on your desired workflow.)
Publish and sync options
When scanning a watch folder and publishing changes to the server the following options are available. Some are only available with a quick folder scan (which compares an entire folder with what’s on the server in one go, but without detailed media file analysis) or with a regular watch folder (which processes one file at a time, with full media analysis).
Check size & date
Normally folder scan just checks for an existing clip with the same file path but with this option if the file size or date has changed it is processed again as if it’s a new file. (With a regular watch folder action the file is always processed again if the file size changes.)
Open early
Open the target catalog early, before ingesting the file, so we can test for existing clips with the same path and skip the import if it’s a duplicate. This doesn’t work if the catalog contains a variable expression that depends on the clip.
Avoid duplicates
Skip the file if it already exists in the target catalog, based on the file path. Requires the ‘open early’ option. (This is an older mechanism and has been superseded by quick folder sync and detecting file moves if more advanced workflows are required.)
Update existing
Similar to ‘avoid duplicates’ this looks for an existing clip in the target catalog and if found does a reanalysis to update technicate metadata on the existing clip.
Detect file moves
Rather than just checking for an existing clip with the same file path, when a new file is detected the worker calculates a file hash and checks for an existing clip with the same hash. If that clip is now offline, and if the filename is the same but in a different directory, or the directory is the same but the name has changed, this indicates that the file has been moved or renamed and the existing clip is updated
Move proxies
If a file move has been detected and the media path of an existing clip is updated then move or rename any corresponding proxies in the same way.
Update catalog
If the catalog we are publishing to contains variables (typically based on the file path because we are mirroring the catalog structure based on the directory structure) then if we detect a moved file and have updated the media path then use this option to also move the clip to the corresponding new catalog.
Detect file deletes
Before the initial file scan takes place the worker gets a list of all the files within the watch folder that the server knows about. If any of those files are now missing the corresponding clips are moved to a special ‘Deleted Files’ catalog.
Widen search
To protect against treating a file that has been archived and purged detection of deleted files doesn’t apply to clips with a blank archive status. And when detecting file moves normally only candidates within the same production group and root watch folder are considered. The widen search option relaxes these checks.
Any catalog
When doing a folder scan or detecting moved files check with any catalog on the server (in the current production group) not just the specifed catalog.
If both ‘Any catalog’ and ‘Update catalog’ are selected, and if you are maintaining a catalog structure to mirror the top few levels of the folder structure, then if a clip is moved to the wrong catalog (or if the catalog structure changes) then clips will be moved to the correct catalog. (This doesn’t happen immediately because the folder scan is triggered by changes on disk, so after changing the catalog structure you should restart the worker.)
Replace catalog
When importing CDV catalog files and publishing them to the server this will replace an existing catalog with the same name
CatDV XML batch files (v1)
You can submit a batch of media files to the CatDV Worker for processing by providing a list of file names (optionally with metadata) in the CatDV XML file format. You can create an example XML file in the format the worker expects by exporting clips from CatDV using File > Export As > CatDV XML Batch File, though not all the fields in that file are used when you reimport a CatDV XML file. The main field you need to specify is the MEDIAPATH of the file to import but you can also specify additional metadata, for example:
<CLIPS>
<CLIP>
<MEDIAPATH>/Volumes/Media/Folder/File1.mov</MEDIAPATH>
</CLIP>
<CLIP>
<NAME>My clip name</NAME>
<MEDIAPATH>/Volumes/Media/File2.mp4</MEDIAPATH>
<NOTES>This is a clip with metadata</NOTES>
<USER1>User field one</USER1>
<TAPE>Tape001</TAPE>
<BIN>Bin name</TAPE>
</CLIP>
</CLIPS>
There are two ways to import a CatDV XML file, in either “batch” or “immediate” mode. For further details, see the sections on Batch Operation and Offline Workflows below.
If you are submitting a batch of files to the worker for processing, possibly involving a transcode of each file, then you need to create a CatDV XML batch file (version 1) and import it in “batch” mode to create a separate worker task for each file. If you are importing a set of clips in one go (or updating existing clips) then you should use the new CatDV XML file format version 2.
New CatDV XML files (v2)
While version 1 XML batch files will continue to be supported, the new CatDV version 2 XML file format is more modern and more flexible and properly supports sequences, subclips, markers, metaclips, thumbnails, and more.
To import a clip by analysing the media file but specifying certain metadata fields you can write:
<catdv version=’2.0’>
<options analyseMedia=’true’ updateOrAdd=’add’ />
<clip>
<name>My clip name</name>
<notes>This is a clip with metadata</notes>
<tape>Tape001</tape>
<bin>Bin name</bin>
<metadata>
<field index=’1’ name=’User 1’>User field 1</field>
<field index=’23’ type=’multi-picklist’ name=’Weather’>
<value>Rain</value>
<value>Cloud</value>
</field>
</metadata>
<media>
<filePath>/Volumes/Media/File2.mp4</filePath>
<metadata>
<field key=’Author’>Joe Smith</field>
</metadata>
</media>
</clip>
</catdv>
You can use XML to delete an existing clip on the server:
<catdv>
<options updateOrAdd=’delete’ searchBy=’remoteID’/>
<clip>
<remoteID>623462</remoteID>
</clip>
</catdv>
The following example demonstrates creating a clip and a subclip referring to the same source media object, without performing media file analysis:
<catdv>
<clip>
<name>File.mov</name>
<type>Movie</type>
<notes>Master clip</notes>
<in seconds="0.0">0:00:00:00</in>
<out seconds="10.0">0:00:10:00</out>
<timecodeFormat>25.0</timecodeFormat>
<media id='0'>
<filePath>/Volumes/Media/Offline/File.mov</filePath>
<video>Apple ProRes 422 (HQ) (1920x1080 25.0fps)</video>
<audio>24-bit Integer (48.0 kHz, stereo, 16 bit)</audio>
</media>
</clip>
<clip>
<name>Subclip</name>
<type>Movie</type>
<in seconds="5.0">0:00:05:00</in>
<out seconds="7.0">0:00:07:00</out>
<media id='0'/>
</clip>
</catdv>
Notes on the new XML file format:
· Although none of the fields are mandatory when importing a clip, in order to create a useful clip (without relying on CatDV or the Worker analysing a media file) as a minimum you should ideally provide all the following: <name>, <type>, <timecodeFormat>, <in>, <out> (or <duration>), plus a <media> object with <filePath>, <video> and <audio> elements.
· The following timecode formats are supported: 1.0, 10.0, 15.0, 23.98, 24.0, 25.0, 29.97, 29.97 nd, 30.0, 50.0, 59.94, 59.94 nd, 60.0, 100.0.
· <clip> and <media> (and <importSource>) elements can include an id attribute, which allows multiple subclips that refer to the same source media object to be represented. It also allows sequences to refer to their source clips. (For <media> and <importSource> the id is an integer, while <clip> can use any unique string.)
· There is a consistent syntax for user-defined and media metadata fields, paving the way for general metadata fields in CatDV Server 7
· Multi-grouping fields take multiple values by providing multiple <value> elements rather than using a new line delimiter.
· Markers have separate elements for <name>, <category> and <description>, which allows for additional custom marker columns to be added when using CatDV Server 7.
· Time code values and timestamps (and also file sizes, data rates, and clip types) are stored both as an internal representation and a user-friendly formatted representation. For example, <in seconds=’1.5’>0:00:01;15</in>, <modified timestamp="1420560808038">Jan 6, 2015 16:13:28</modified>, <fileSize bytes="1116192000">1.04 GB</fileSize>, etc. On export both representations are used but during import the internal representation is preferred.
· Thumbnails can be embedded in the XML file, stored as base64 encoded JPEG data (which must not exceed 64KB per thumbnail). This allows a complete clip representation including thumbnails to be imported into CatDV via XML, even if the media file is offline.
· For examples of other features such as as <sequence>, <metaclip>, and <importSource> elements please export a version 2 XML file from CatDV or the Worker. A DTD can be provided on request.
When importing an XML file you can provide an <options> element to control how the XML file is interpreted on import and whether to update existing clips or add new ones:
· You can control whether to analyse the media file on import (to determine the clip duration, technical metadata, extract metadata from the file name or a sidecar file) using <options analyseMedia=’true’/>. By default, media files are not analysed and all the technical and other metadata is specified in the XML file.
· You can specify whether to update existing clips stored on the server or insert new clips using an element such as <options updateOrAdd=’updateOrAdd’ searchBy=’filePath’/>.
· Valid update modes are ‘add’ (this is the default and results in new clips being added even if they already exist), ‘addIfNew’ (add a clip if it doesn’t already exist, otherwise do nothing), ‘updateOrAdd’ (update an existing clip if it exists or add a new one), ‘updateOrIgnore’ (update an existing clip if it exists, otherwise do nothing) and ‘updateOrFail’ (update an existing clip if it is found, otherwise report an error).
· The special update mode ‘delete’ can be used to delete existing clips on the server.
· Existing clips can be searched for by ‘remoteID’ (the unique integer database id of a clip), ‘clipRef’ (the user-settable clip ID), ‘filePath’, ‘clipRefAndPath’, ‘catalogAndPath’, or ‘catalogAndClipRef’. Note that only remoteID is guaranteed to be absolutely unique so any of the other options could result in multiple clips being updated (or deleted).
· Normally updating or adding clips always applies to the server, both when the XML file is processed by the Worker or by CatDV/Pegasus desktop clients. Use <options updateLocal=’true’/> to update clips in the currently open catalog in memory in the desktop client.
· If you update an existing clip via XML only those fields which are specified in the XML file are updated and other fields keep their original values. You can update user defined and media metadata fields, standard clip fields such as name, notes, status, tape, bin, record date, and rating, markers, plus the media path and archive status, via XML. With care you can also update the clip in and out points, type, poster, and clipRef. When updating markers, the markers you specify are normally added to any existing markers unless you specify <markers replace=’true’>…</markers>
· When updating clips you can choose whether to add new thumbnails or delete existing ones first and replace them by specifying <thumbnails replace=’true’>.
· When updating an existing clip you can specify how to combine the new value for certain elements (<notes>, <bigNotes>, and <field>) with the existing value by adding a merge attribute with values: ‘replace’ (overwrite the old value), ‘prepend’ (prepend the new value to an existing value), ‘append’ (append the new value), ‘default’ or ‘true’ (don’t overwrite an existing value but set it with new value if it is currently not set), and ‘merge’ or ‘combine’ (split the values into lines and merge the two sets of lines). For example <notes merge=’true’>Under review</notes>
· You can have several <options> elements, each of which will apply to all subsequent clips in that file until the next <options> element is encountered.
· When importing clips via XML the import source is normally set to describe the XML file the clips were imported from. It is possible to override this by providing an <importSource> element and specifying <options importSource=’true’/>.
Metadata extraction rules
Many workflows involve importing files that have been named according to strict naming conventions and where the file name or file path is structured to represent elements such as the series and episode of a show, the type of shot, the camera used, the scene and take number, and so on. While it is possible to use the Publish tab to set clip fields based on worker variables and regular expressions applied to the file path can be awkward when the file naming conventions become more complex.
A new and more powerful metadata extraction mechanism has been added which involves providing an external mapping file that lists patterns to look for and then which metadata fields to set when importing a file if those patterns are found in the file path.
You can specify a file containing metadata extraction rules on the Options tab of the worker config. The format of the file is lines of the form: pattern tab field id tab value to set newline. The pattern can either be a simple text pattern or a regular expression. Blank lines and comment lines starting with a semicolon are ignored.
If the pattern contains nothing but upper or lower case letters and numbers then it’s taken as a token that is looked for in the file name. Tokens in the file name must match case and be delimited by a space or punctuation character. For example, the file name “FB_S2_XYZ_Scene01.mov” would match FB and S2 but not s2 or XY or 01.
You might have the following metadata extraction rules and user field 1 would be set to “Football” and user field 2 to “Season 2” when the file above is imported.
FB U1 Football
BB U1 Basketball
S1 U2 Season 1
S2 U2 Season 2
If the pattern contains anything other than basic alphanumeric characters it is taken to be a regular expression, where certain symbols such as . + * ( ) [ ] ^ $ \ { } etc. have special meanings.
If the pattern starts with lower case ‘m’ or ‘n’ and followed by a punctuation character such as comma, semicolon or slash then it is taken to be a regular expression that applies to the entire file path or just the file name respectively, and the specified character is the delimiter at the end of the regular expression (as you might want to use something other than / when matching file paths). In either case, you can follow the regular expression with ‘i’ to ignore case. The value of the first subexpression within parentheses is available in $1, the second set of parentheses as $2 and so on, and $0 refers to the full pattern.
For example, you might have
n/Scene(\d+)/ U3 Scene number $1
This would look for a sequence of digits occurring after the text “Scene” anywhere in the file name, and if found store the scene number in user field 3.
You can use a more complex pattern like m,/([^/]+)/[^/]+$, to extract the parent folder into $1, using comma as the regex delimiter and where forward slash is the file path separator on Mac OS X and Unix. [^/]+ means any sequence of one or more characters which aren’t a slash and ‘$’ anchors the search to the end of the file path.
If you omit the pattern then you can have several substitutions triggered by the same regular expression, saving on evaluating the expression more than once. For example
m,^/Volumes/Media/([^/]+)/([^/]+)/, U2 $1
U9 $2
would store the first folder after /Volumes/Media in user 2 and the second folder in user 9.
You could use a similar mechanism to pre-populate a set of metadata fields such as customer name, contact details etc. based on which customer folder the file is in.
Detailing all the capabilities of regular expressions is beyond the scope of this document but if you require help in defining metadata extraction rules (or developing worker scripts more generally) then your systems integrator or our professional services team will be able to help.
To simplify working with a mix of Mac and Windows paths all file path separators are converted from backslashes to Unix-style forward slashes so regular expressions should only check for /, even on Windows. Also, you can define root names and match for these as well, so the pattern above could be written as
#root MEDIA /Volumes/Media
#root MEDIA \\server\media
m,^MEDIA/([^/]+)/([^/]+)/,	U2	$1
You can organise rules into separate files and import another file using
#include "/path/to/file.txt"
Metadata naming rules on the server
If you use Server 10 you can now use metadata extraction “naming rules” that are stored on the server and defined using the web interface. Each rules consists of one or more base paths (or root directories) and then a list of clip fields to be set from elements of the file paths or file name. You can use value lookups to map or expand elements (eg. P:Pilot, S1:Season 1, etc.).
When you enter the metadata rules file path you have the following options:
· Enter a path to rules stored in a file (as above)
· Leave the file path blank to load naming rules from the server (if present) and do nothing if they are not there
· Enter a ‘*’ to load naming rules from the server and report an error if they are not there
· Enter a ‘-’ to ignore naming rules on the server even if they are there
Exporting watch definitions
It is possible to export watch action definitions (and also conversion presets) by pressing the Export button. This will create an XML file with extension .catdv that can be dragged into another worker (either into the main window or into the watch action list in the configuration dialog) to install the watch action on that machine. If the watch action includes movie conversion steps the required conversion preset definitions are automatically included in the .catdv file.
When you install a watch definition you are prompted whether to replace an existing watch action with the same name or keep both and rename the old one.
You can parameterise .catdv settings files so that when a user installs them they are prompted to specify the values for certain parameters, such as the watch folder location, an FTP password, or YouTube account details, as these will differ from installation to installation.
To parameterise the file you should include text in the format {{Parameter name{Type information}:Default value}}. Everything between {{…}} will be replaced with the appropriate value entered by the user. For example,
<convert previewDir="{{CatDV proxy folder{DIR}:/Volumes/CatDVProxies}}" … >
or
<job … md5Checksums="{{Calculate MD5 checksum?{Yes=true,No=false}}}" … >
You can omit the type information and default value. Omit the type information for plain text fields, use {FILE} or {DIR} for a file or directory chooser, or use a comma-separated list {Option1,Option2,…} for a drop down pick list of values. If required these options can have a different display value from what is inserted into the final definition, for example with {Red=0xf00,Green=0x0f0,Blue=0x00f,Yellow=0xff0} the user could pick Green from the drop down list when installing the action but 0x0f0 would be inserted into the definition.
Server-triggered tasks
For server-triggered tasks you use the ‘Server Query’ tab to specify a query that will be performed to find matching clips for processing. You can also specify a check interval, and whether only to process clips which have a file which is currently online and accessible. If you specify a root folder, only files within that folder are processed, and that folder is used when calculating relative paths (see below).
Queries are defined in the same way as advanced queries in the CatDV client. If you specify multiple query terms (for example, based on clip status, on modification date, and so on) they must all be true for a clip to be processed unless you check the ‘OR’ box, in which case just one of the OR terms needs to match. Check the ‘NOT’ back to invert that condition (ie. match all clips for which the condition is not true).
Just as with watch folders you should take care that you don’t specify actions that will be performed in an endless loop. For example, if you have a server-triggered action based on clips whose status is “To be converted” you should update the status to something different such as “Completed” on successful completion in the post-processing stage. By default, the worker will only process each clip once per session but you can override this if required by checking the “allow polling” option.
Each clip that matches the server query will be added as a separate task into the task queue (as there could be a large number of files that each requires a lengthy transcode). If you perform an operation such as exporting an XML file on the Conversions tab it will therefore export one clip at a time – see the section below on ‘Batch operation’ if you want to export all the matching clips in one go.
Specifying a root folder
When processing files it’s often a good idea to specify a ‘root’ folder. The file path is then calculated as being relative to this root folder which can result in shorter file paths. For example, if you have an original file in /Volumes/Media/Online Media/Project/File1.mov and want to build a proxy of that file in /Volumes/Media/Proxies then you should specify /Volumes/Media/Online Media as the root folder or the proxy will be /Volumes/Media/Proxies/Volumes/Media/Online Media/Project/File1.mov rather than /Volumes/Media/Proxies/Project/File1.mov.
If you use a watch folder files are taken relative to the watch folder itself but when dragging files on the worker icon you need to specify a root unless you want the entire original file path to be used. For server-triggered actions the path is taken relative to the root specified by any applicable path mapping. (To specify a root even though the original file path is already correct, specify a dummy path mapping from the root to itself.)
Job definitions
The job definition panel defines what actions are performed on files in the watch folder. You should give each job a short descriptive name so you know what the job does.
Any or all of the following actions can be configured, which will be performed in the given order:
1. The file is “imported” (see Pre-Processing section above)
2. Any movie conversions that you specify are applied. These can include creating CatDV previews or exporting the movie to one or more other locations and formats, at different resolutions. You can define your own movie conversion presets which are saved globally so you can apply them to different watch actions.
3. After the movie conversion(s) have all completed without error, which may take some time, post-processing can be applied to the original file in the watch folder. These include copying or moving the file – or deleting it. Take care when using this option and make sure it is what you want in your workflow! As well as specifying the destination directory you can specify how much if any of the path is preserved for those cases where you have subdirectories in the watch folder.
4. You can also export the clip(s) as an XML file and execute arbitrary operating system commands (see below). These can be combined so that the external command can read the value of clip fields from the XML file, and then update any desired clip fields as a result of its processing.
5. Finally, the clip(s) are published to the CatDV server so they are visible to users via the CatDV client application. You can publish all clips to the same catalog, or leave the catalog name blank and have a new catalog created each time. Normally, publish operations are ‘batched’ (using the Publish Interval setting) so one catalog might contain several files when it is published. If you converted the movie to a different format or automatically moved the file out from the watch folder you can choose to update the media reference in the clip to point to the new location.
6. Additionally, if you specify the file name for an HTML index file that file is automatically updated to include details of all the clips in the current catalog. You can also send an email notification to inform users that a new file is available.
Executing commands
As part of a job you can run an arbitrary operating system command invoked via a command line interface. Such commands might include copying a file by FTP, using an external transcoding engine such as FFmpeg or Telestream Episode, or running a batch command or shell script, and provides a very powerful way of extending the capabilities of the worker.
For example, under Mac OS X you could write
/usr/bin/ftp –u ftp://user:password@host/public/upload/ $l
to upload all the converted movie files to the /public/upload directory on ‘host’ via ftp. The ‘curl’ command gives even more options for copying files to an external server (including via https, sftp, etc.)
Up to three external commands can be performed, at different stages in the processing. The first command is intended for external transcoding or other pre-processing, the second command is intended for interaction with external systems via XML and supports updating clip fields as a result, while the final command could be used for FTPing completed files or performing notification that the action has completed.
To pass parameters to the external command you can either export the clip(s) being processed as an XML file (using an optional XSLT file to translate the file to another format from CatDV’s default XML format) or pass them via the command line using a variable expression. To update clip fields as a result of processing the command check the ‘parse output’ option and write updates to the standard output of the process using fields ids such as NT for notes, one per line. For example:
INDEX=0 -- if we are processing multiple clips specify which one
@STS=Complete -- set the clip Status field
@U5+=Processed by my command -- append to the User 5 field
See below for a list of variables you can use use on the command line to refer to the original file being processed, the file(s) it was converted to, and more.
Variable expressions
When executing commands (and also when copying files, sending emails etc.) you can use the following variables to refer to the current file being processed and other special values.
$i Full path of the input file (after preprocessing) (eg. “/Media/Original/file1.mov”)
$f The filename part only of the input file (eg. “file1.mov”)
$g The base part of the input filename after preprocessing (eg. “file1”)
$G The base part of the original filename before preprocessing (ie. before renaming)
$e The extension of the input (eg. “.mov”)
$E The file extension, converted to upper case and omitting the period (eg. “MOV”)
$p Full path of the input file’s parent directory (eg. “/Media/Original”)
$P The path of the input file’s parent directory relative to the root (eg. “/Original”)
$q Name of input file’s parent directory (eg. “Original”)
$Q Name of input file’s grandparent directory (eg. “Media”)
$R Name of input file’s great-grandparent directory, if any
$w The file root directory that paths are relative to (eg. the watch folder)
$r The original input file relative to the root directory
$h The first path component after the root, if any
$b Full path of the original input file that triggered the action (before preprocessing)
$B Name of the xml batch file (if this job was triggered from a batch file)
$I The existing server clip id (if this job was triggered by a server query)
$o Full path of the converted movie (first movie only if multiple movies were created)
$z Full path of the updated file that the clip will refer to, if different from $i
$c A list of all the converted movies concatenated into one string
$l A list of all the converted movies as separate arguments
$L A list of all the files being added by a Folder Scan action as separate arguments
$K A list of all the files being added by a Folder Scan action concatenated together
$a Name of catalog the clips will be published to
$t Tape name (if known)
$s Starting timecode of the input file (if it’s a supported media file containing timecode)
$d Duration of the input file (if it’s a supported media file) in timecode format
$n Number of scenes that were detected (if scene detection was enabled)
$v A summary of the format of the input file (if it’s a supported media file)
$u A long Unix timestamp that could be used to create a ‘unique’ filename
$U A unique name dervived from the current timestamp, shown as letters and digits
$D Current date as yyyymmdd, eg. 20081231
$M Current year and month as yyyy mm, eg. 2009 01
$T Current time as hhmmss, eg. 235959
$S Task summary (available when sending email notification)
$j The job name
$k The task id
$m The name of the importer being used
$x The standard output of executing the previous command
$y The error output of executing the previous command
${id} Value of arbitrary clip fields, eg. ${U12} is User12, ${NT} is the Notes field $1..9 Separate parts of the original filename, delimited by space or punctuation characters
$_d The current day of month ($_D without leading zero), eg. 31
$_m The current month number ($_M without leading zero), eg. 12
$_y The current year ($_Y for last two digits of year only), eg. 2011
$_I The current time as an ISO-formatted date (eg. “2015-07-21T11:45:17+00:00”)
$_i The current time formatted for user-defined date fields (eg. “2015-07-21 11:46:12”)
$* Special file naming rules in certain contexts (eg. next consecutively numbered file)
$_? The matching filename in ‘Test File Existence’ steps with a wildcard
$\n Include a literal new line character (also $\r for carriage return, $\t for tab, etc.)
$$ Include a literal ‘$’ in the command.
Note that it is possible for a single input file to result in zero, one or many converted movies. First, you can define more than one movie conversion (for example, to create versions at different resolutions). Secondly, you can perform automatic scene detection and specify that each scene is converted to a separate file. Depending on what arguments the command you are executing expects you might therefore want to use either the $o, $c or $l variable.
Not all the variables will be available at all times. For example, $x is only available after executing command 1, clip fields are only available for server-based tasks or after importing a movie, and so on. This also means you can’t use clip fields or the tape name when naming a catalog because the catalog is opened before the clip is imported.
To determine the id of clip fields you can select “Show attribute IDs” on the CatDV client and look at the identifier that appears in parentheses when choosing a field (for example when performing a query or customising a view). For example, ‘${CREF}’ for clip id, ‘${ID2}’ for the import date, ‘${U1}’ for user field 1, ‘${@Album}’ or ‘${@FNumber}’ for a named metadata field when importing an MP3 or Exif file.
In the case of timecode values such as ${I1} for In point or ${O2} for Out2 you can provide a format modifier such as ${I1:t} to use the time as decimal seconds rather than a formatted timecode value, or ${I1:f} to display the number of frames. This is sometimes useful when passing command line arguments to a tool such as ffmpeg. In the case of timestamps such as ${RD1} or ${DT1} etc. for camera record date you can use ${RD1:s} to display a Unix timestamp (time in seconds since 1 Jan 1970), ${RD1:iso} to display in ISO format, and ${RD1:ago} to display how many seconds in the past from now the time is.
You can use variables in the following places:
· When specifying the subject, body or recipient of an email notification
· When setting or modifying a clip field such as Status or Notes
· When executing a command via the command line
· When naming the catalog to publish clips to on the server
· When specifying the path to copy or move a file to or specifying the destination of a movie conversion (if you choose ‘Expand variables’ as the file naming option)
When a variable contains a file path (separate components delimited with / on Mac or Unix, or \ on Windows) you can use array syntax to extract parts of the file path. You can count positions starting from either the left or right of the file path, they count down from 0 at the end or up from 1 from the beginning, so that $i[0] is the file name part of the input file (the same as $f) while $i[-1] is the parent directory (same as $q), and $i[1] is the first component of the path. You can also have ranges such as $p[1..2] or $p[-2..0].
Regular Expressions
A large number of useful variables that can be used for tasks such as constructing filenames are provided by default. For even greater flexibility, it is possible to modify the variable’s value using one or more regular expression substitution patterns. Regular expressions are commonly used in Unix and other scripting environments and provide a lot of flexibility, at the cost of a rather arcane syntax.
To use a regular expression substitution you should follow the variable with curly braces. The syntax is $variable ‘{‘ ‘s’ ‘/’ search-pattern ‘/’ replacement-pattern ‘/’ ‘}’. For example, if $x has the value “abcde” then $x{s/b/x} would be “axcde”.
The regular expression features provided are similar to those provided by Perl. Only the ‘s’ command is supported, but multiple commands can be included within the braces, eg. ${U1}{s/c/x/s/d/y/} to replace c with x and d with y in user field 1.
Any delimiter can be used after the ‘s’ instead of ‘/’, and the final delimiter before the ‘}’ may be omitted. The command may be followed by ‘g’ to apply the substitution globally to all occurrences (by default only the first occurrence is replaced) or ‘i’ to perform a case-insensitive match (by default it is case sensitive).
Within the replacement pattern any sub-elements of the search pattern enclosed within (round) parentheses can be included as ‘$1’ for the first sub-element, ‘$2’ for the second, and so on, so that $a{s/\D(\d*).*/$1/} would extract the first group of digits from $a. Other worker node variables can be included in the regular expression command, either within the search or replacement pattern. For example, $f{s/$_y//} would give you the value of $f with any occurrence of the variable $_y removed.
As a more complete example, let’s say we want to pick the first part of the parent folder name $p. Let’s consider how is the following statement, which looks like someone sneezed on the screen, processed: $p{s,^.*/(\S+)[^/]*$,$1,}
The curly braces mean take $p and modify it. What modification? The character after s is comma, so that's the delimiter and we're replacing XXX with YYY, whatever XXX and YYY may be: $p{s,XXX,YYY,}
XXX, the pattern we're searching for, is ^.*/(\S+)[^/]*$ which can be broken down as follows:
^ = start of string/start of line
$ = end of string/end of line
. = any character
* = previous pattern repeated any number (0 or more) times
/ = literal forward slash (if we're processing file paths on a Mac, use \\ instead if on Windows)
\S = any non-space character (\s = any white space character)
+ = previous pattern should occur 1 or more times
[..] = a list or range of characters to match
[^..] = negate the set of characters, ie. match any character not in the list
(..) = parentheses surround the part we're interested in
[^/]* = any combination of characters other than forward slash.
Combining all the above, this means take the variable $p, then try to match anything from the start (^.*), followed by a slash (/), followed by one or more non-space characters (\S+), followed by any number of characters excluding / ([^/]*), all the way up to the end of the string ($). All of this is replaced by $1.
We have to insist on there being a number of non-/ characters up to the end of the line after the text we're looking for as that's how we make sure we're picking up characters after the last forward slash, rather the first one.
The parentheses round the \S+ mean that we can refer to the characters matched by that expression later. That's what the $1 in the substitution pattern refers to, ie. we're matching the whole string and replacing it with just those non-space characters after the final /.
You can look up documentation for the ‘java.util.regex.Pattern’ class online for full details of the regular expression syntax that is supported, or press the ‘Help’ button in the watch item editor to see some examples. There are also a number of online tutorials and guides that describe regular expressions.
How file naming works
Many operations in the Worker involve creating new files (copies of existing files or rendered converted files) or renaming existing files, so various mechanisms are available to choose both the destination name and the folder structure.
A key concept is that of “relative paths”, ie. the remainder of the file path relative to a particular root directory. When an action is triggered by a watch folder the watch folder itself is used as the root folder, but when the action is triggered by drag and drop or by a server trigger you can explicitly specify a root folder.
If you choose “Use filename only” the folder hierarchy is ignored and files are placed directly in the destination folder, whereas if you choose “Preserve entire path (from root)” the folder hierarchy relative to the root folder is maintained within the destination folder.
If you choose “Number files consecutively” or “Use current timestamp” then files are placed directly in the destination folder and the name is either an incrementing number (the next available number which isn’t already in use in the destination folder) or based on the current date and time.
“Expand variables” gives you the most flexibility when naming files, and most of the other options can be implemented with variables, although it can sometimes be a bit tricky defining exactly what is required. When the action is “Rename files” the pattern you specify defines the filename only (as the file is being renamed, not moved to another folder) so you might enter something like “$Q_$f” as the destination. When copying or moving or converting a file, however, you need to specify both the destination folder and the filename, for example “/Media/Converted/$P/$D_$g.mp4”.
When converting or exporting a file the correct filename extension (such as “.mov”) is normally added automatically depending on the format being exported, unless you check the “exact name” option.
As there is so much flexibility in how files can be named (and in functionality that can be programmed with the worker more generally) you should always test your Worker scripts carefully with some simple test files before relying on a workflow. In particular, you should make sure that your worker configuration matches the media search paths configured in the CatDV client application preferences (and in the Live HTML/Web Publisher configuration if you are using the web interface) and that you have a thorough understanding of CatDV’s concept of file paths relative to a particular root directory.
This complexity is necessary because no two workflows or installations are the same. Although it is usually possible and can be very tempting not to specify a root folder (so the entire file path is treated as if it was a relative path relative to the file system root “/”) you should always try to consider what the logical root folder for a particular operation is because of the benefits this brings:
· Flexibility – if you add a new disk or need to move a folder it is much easier to reconfigure the system if you use relative rather than absolute paths. It is also possible to specify different actions or different search paths for different root folders.
· Efficiency – relative file paths are shorter, and in the case of the CatDV client searching for files using a search path vastly fewer file locations need to be checked if you correctly specify the root folder
· Security – rather than giving users access to the entire file system you can restrict it to particular folders and don’t need to expose complete file paths (for example through the web interface)
Movie conversions
The main reason why the worker node implements a queue of tasks is of course because re-compressing video from one format to another tends to be a very time consuming process. You define the compression you require in the movie conversion editor.
First, you specify the destination for the converted movie. If you are creating CatDV previews then these are named automatically (based on the tape name and timecode value of the clip for tape-based previews, and based on the relative path from the root for path-based previews) and all you need to do is specify the CatDV preview root directory. Otherwise, you can specify any output directory you want and how you want the output file name to be derived given the input filename.
Then you specify the movie format itself by creating a new movie conversion preset or selecting one you defined earlier. A conversion preset can be used by several different task definitions to ensure they all create movies in a consistent format.
When defining a movie conversion preset you need to specify the exporter (such as QuickTime movie, MPEG-4, AVI etc.) and settings particular to that exporter, as well as general options such as the frame size and whether to add burnt in text such as a copyright message. You can either choose the exporter and customise the setting yourself or use one of the built-in settings. The original CatDV preview presets are available, optimised for different factors like speed of compression, but note that these are designed for very small file sizes and generally implement low frame rates of 8 or 12 fps so the OfflineRT, MPEG4 (Quality) and MPEG4 (Normal) settings are normally preferable. Or you can fully customise the movie export setting, using any QuickTime exporter, codec, frame rate and quality settings.
You can resample the movie to a smaller frame size by entering the desired bounds and whether to preserve the original aspect ratio by making the movie smaller than those bounds. If you leave these boxes blank it will use the original movie size (for “exported” movies) or assume the preferred size of 320x240 for CatDV previews. If you are creating a QuickTime .mov file the worker node will automatically add a QuickTime timecode track, which you can make visible or not as required.
After defining the compression settings you should enter a short descriptive name and save it as a conversion preset so you can reuse it when defining other watch actions.
As well as using the default QuickTime exporter you can also use the Xuggle exporter (if installed) and the DSJ DirectShow exporter (when running under Windows). Different exporters will have different capabilities and support different codecs but the basic approach for configuring them is the same in each case.
Exporting stills
As well as exporting movies, you can also define a conversion that will extract one or more JPEG still images of the media file.
To export a single still image from each clip you can choose to export either the first frame, the poster frame or the first thumbnail of that clip. There are also options that let you export all the thumbnails of a clip, all the event markers, or all event markers of a particular category. When exporting a single image the name is determined as specified in the file name dropdown, but when exporting multiple images the name is determined automatically by appending an incrementing number to the clip name. When choosing images of a particular marker category the name of that marker category is included in the filename. If you prefix the specified marker category with ‘*’ then the name of the event marker is also included. (For example, if you choose to export markers of category “VIC” the resulting files will have names such as <clipname>-VICnn.jpg, whereas if you specify “*VIC” the files would be called <clipname>-VICnn-<eventname>.jpg). The “HTML Thumbnails” option exports all the thumbnails of a clip using the special naming scheme that CatDV uses when exporting clips as HTML or XML.
The images are always exported as JPEG files but you can define the maximum size (the image will be scaled so it doesn’t exceed the specified size), the compression quality, and whether to preserve any Exif data from the media file.
Batch operation
If jobs are submitted via an xml batch file or as a result of a server query this will result in a separate task in the queue for each clip or file being processed. Actions defined on the Conversions and Post-Processing tabs, such as renaming the file or executing commands, will apply to each clip in turn, which may not be what you want if you want to process all the clips as a single batch. The following operations apply to an entire batch of clips in one go:
· You can export all the clips matching a server query into one HTML or XML file using the Batch Export section on the Parameters tab. This export is done once, before the individual files are processed. This applies to server queries only.
· To execute a command just once on completion of the batch (perhaps to submit all the clips to an external system in one go) use the special “Execute command 4” field on the Post-Processing tab. This applies to both server queries and batch file imports.
· Write a shell script to invoke the worker command line interface (see below).
The following special variables are available on batch completion and when naming the XML or HTML file to use:
$I comma-separated list of server clip IDs (for server queries)
$B the batch file name (for xml batch jobs)
$n total number of tasks processed in this batch
$m of this total, how many completed successfully
$c all the files processed by the batch (concatenated as one value)
$l all the files processed by the batch (as a list of separate values)
Also $j, $u, $U, $D, $M, $T, $_d, $_m, $_y have the same value as during normal task execution.
If you need to update the clips on the server during the batch completion phase you can do so using the worker command line by passing in the clip ID list, for example:
catdv -query ID:65:$I -set Status=Complete
You can monitor the status of a batch by looking at the batch id column in the task list and the batch details section on the details page for an individual task.
Batch vs individual operations
Most watch actions create a separate task for each clip or file being processed. This is suitable for actions which involve doing a full file import (full media file analysis and thumbnail extraction) or transcoding and where each task can take a signficant amount of time.
In some situations it is more efficient to operate on a large group of clips as a single task however, though in these cases you won’t be able to perform operations such as a transcode on each file. The following batch operations are available:
· Setting up a file watch folder with the “Folder Sync (Quick)” importer. Any new files that appear in the watch folder are quickly added to the catalog in one go, without doing any per-file analysis.
· Importing a CatDV XML file in immediate mode (see below) using the “CatDV XML File (Quick)” importer. This will quickly create clips using the data provided in the XML file without doing any per-file analysis.
· Importing a CatDV XML file in immediate mode (see below) using the “CatDV XML File” importer. This will do a full import of all the files referred to by the XML file in one task, so care should be taken with this option as the whole operation will fail if one file has an error and you also don’t get the benefit of scheduling different tasks across multiple processors if the import takes a long time.
· Performing a “Bulk Query”. This will perform a server query to find clips to process but rather than creating a separate task for each clip will process all the clips in one task. It is suitable for doing a bulk update of clips and then publishing changes back to the server but where no transcoding or media file analysis is required.
Offline workflows: batch import and reanalyse media
Occasionally it is necessary to create an asset record before the media for that asset is available. The Worker Node has new features to enable this way of working.
First, you can use a CatDV XML batch file to create new clip records without media being online. CatDV XML files can describe one or more clips including the clip name, media path, log notes, event markers, and technical metadata. (To see some example files you can export selected clips from CatDV Pro as a CatDV XML File.)
There are two distinct ways to import a CatDV XML file into the worker, batched and immediate. In both cases you define a watch folder where xml files will be placed.
In batched mode your watch action specifies that the job is triggered by a batch file and a separate task is added to the queue for each media file listed in the batch file. Batched mode is suitable if you want to build proxies for each media file but only works if the media files are online.
By contrast, in immediate mode the entire xml batch file is processed as a single task but one that can result in many clips being published to the server. Define a normal file triggered watch action but choose ‘CatDV XML File’ from the importer drop down. Ideally you should avoid doing lengthy transcodes when importing xml files in immediate mode but the advantage is that the files don’t need to exist yet. If the file doesn’t exist an offline clip is created instead, using the metadata specified in the xml file.
Secondly, the Worker Node now has the ability to reanalyse media. Just as with the Reanalyse Media command in CatDV Pro, this means analyse a media file to read technical metadata such as timecode, duration, and video format from the file as if it was being imported normally but instead of creating a new clip at that point update the metadata in an existing clip record, while preserving any user-entered metadata such as log notes.
There are two ways to reanalyse media, depending on what event you want to use to trigger the analysis.
You can define a normal watch folder so when a media file appears in that folder it is analysed and imported. On the Publish tab you can check the “Update existing” checkbox and if there is an existing offline clip in the catalog being published to whose clip name or media path matches the file being imported then that clip will be updated, otherwise a new clip will be created.
Alternatively, you can trigger the reanalysis based on a server query, possibly combined with the “Process online files only” option, by checking the new “Re-analyse Media” checkbox on the Pre-processing tab.
Development mode
When writing worker scripts it is sometimes annoying to have to wait for the normal poll and settle period before a worker action is performed (for example, if you have a large volume you might only scan for new files every five minutes). Additionally, if you have a lot of files and tasks that complete very quickly because all they do is move a file or publish a clip to the server without transcoding, it can be difficult to see what is happening because they run through so quickly. Both of these problems can be resolved by switching on development mode under general settings. Poll and settle periods are reduced to 10 seconds or less, and you are prompted before each job starts.
Other common techniques for troubleshooting worker actions include:
· Double click a task that has completed in the task list (or press the Info button) to view a summary of the operations that were applied to it and any errors that occurred.
· When configuring watch actions, temporarily disable actions you are not interested in by unchecking the Enabled item
· If a watch action doesn’t seem to be triggered when you expect it to be, click the Test button. This displays useful information such as whether the watch folder is readable or the server query returns any matching clips.
· Turn on development mode
· View the worker log file, which may contain additional details of error messages. There are two (or more) log files. “CatDV Worker Log” displays details of the main worker process, including editing the configuration and the output of the file watcher and server monitor threads, whereas the actual work of transcoding and performing actions is done by one or more separate helper processes, whose output goes to “CatDV Helper Log [2,3,4 etc.]”. The View Log button displays the main worker log, whereas if hold down shift and click the button you will see the latest helper log. You can also access the log files directly in Home > Library > Logs on the Mac (hold down the Option/Alt key then click on the Go menu in the Finder to navigate to the Library folder), or in “C:\Documents and Settings\Username\Application Data\Square Box\Logs” (or similar) under Windows.
Image sequences
By default a quick folder scan will try to detect a directory of consecutively numbered images and turn that into an image sequence clip (rather than ingesting each file individually). This behaviour can be tuned with various advanced properties, for example
imageseq.enabled = true
imageseq.lite = true
imageseq.allowgaps = false
imageseq.rate = 24.0
imageseq.mincount = 10
imageseq.filter = pattern
· If the filter pattern contains a period then ignore the standard list of valid extensions (jpg jpeg gif bmp tif tiff tga dng exr ari dpx png).
· If filter starts with ^ then treat it as regex that entire filename must match.
· Otherwise filename must include filter text as a substring and match one of the valid image type extensions above
So imageseq.filter could be something like “.psd” (to allow .psd image sequences), “.ari” (to exclude any image sequence types other than .ari), “dsc” to process files that have ‘dsc’ in the name, or “^image\d+\.exr$” to allow files like ‘image1001.exr’ etc.
Hints and tips
Here is a collection of top tips for developing efficient Worker Node scripts:
· Ensure that all watch actions reset the conditions as part of the task so that the same clips aren’t processed over and over again. For server queries that look for a clip of status “Do Some Action”, update the status to “Action Done” on completion. For a watch folder, try to implement this as a drop box where files are moved out of the drop box to a more permanent location on completion.
· Avoid file conditions that need to analyse a file to check its contents. Conditions that only check the filename extension are much more efficient.
· Avoid creating very large thumbnails (or large numbers of thumbnails) unless you need them
· If possible, avoid using the “Create metaclip based on MXF UMID” and “Avoid duplicates” options, as they require the entire catalog that you are publishing to to be opened up by the worker before the task is processed
· Test your worker scripts on small numbers of example files before letting it loose on an entire volume. Use development mode (accessible from the General tab) to begin with so you only run one task at a time and can see what’s going on. You can also uncheck the various checkboxes in the Processing panel to slow things down.
· Initially test your scripts with source and destination on your local machine (eg. your desktop) and get them right there first before trying a network volume to eliminate network and permissions issues.
· Avoid reducing the check interval for watch folders or server queries below 60s unless you need to. Rather than speeding things up it might actually slow the worker down. (If you want to speed things up while testing your scripts, turn on development mode as this temporarily reduces the check interval.)
· Avoid the “allow polling” option unless you’re sure you need it
· Avoid having multiple workers on different machines sharing the same workset file. Instead, use multiple processes on the same machine.
· If possible keep the workset file on a local drive rather than a shared network drive.
· Keep the frame size and bit rate of your proxies down. Although the resulting file size isn’t as small as H264 or MPEG-4, using Photo-JPEG (OfflineRT) gives good quality and is much faster to encode and decode.
· Don’t leave the log viewer window open when you’re not using it
· When troubleshooting, reduce the number of processors to 1 (on the License tab) and quit and restart the worker to start a new log file (as the worker log file can get very large when it’s been running for a while).
· If you have a lot of watch actions, disable all but the script that is causing problems then restart the worker. As well as keeping the log file small it will make troubleshooting easier if you only consider one watch action at a time.
· When reporting problems always provide the relevant log files (but see previous point about restarting the worker to keeping the file size down). Use the Save Log Files button from the log viewer to compress the relevant log file(s) into a ZIP archive, and don’t forget to include a screenshot or precise details of which task failed (filename, time of day, error message, etc.) so we know which part of the log file to look at.
· If a file fails to import and get processed the way you expect it to in the worker, try importing it manually into CatDV Pro as that will make it easier to see any errors that are reported and you can check that you have the appropriate codec to play the file.
· Although the worker is fully cross-platform between Mac and Windows, there is a better choice of QuickTime codecs available on the Mac, so this can make a good platform for the worker even if the rest of the system is predominantly PC-based.
· If you have multiple worker licenses, try reducing the number of concurrent processes to see what gives the best performance with your workflow. If you’re doing a lot of CPU intensive transcodes then increasing the number of processes may help but if you are processing a lot of short jobs then you might be constrained by the speed of I/O and applying too many concurrent processes may actually slow it down.
· If you change a job definition you need to resubmit any tasks that have already been queued to pick up the new definition.
Command line interface
Please note that that the ‘catdv’ command line tool is now considered legacy because it doesn’t support http or https connections to the CatDV Server, and only supports the old user-defined field indices like U1 etc. rather than new field identifiers.
Bundled with the worker node software is a command line interface that can be used to query the CatDV database to generate customised reports, or to automatically update the server for use in external scripts of various kinds. Unlike the regular Worker Node, where automated actions are triggered from within the CatDV system (by a clip status change on the server or by means of a watch folder), the command line interface is ideally suited for system integrators who need to update clips as a result of an externally triggered event.
To use the command line tool you need to access it from a Terminal window or DOS command prompt. It’s not a double clickable application. Either copy the ‘catdv’ executable to a location on your path (eg. /usr/local/bin or C:\WINDOWS\SYSTEM32) or edit your PATH variable. Alternatively, you can specify the full path to the executable. Once you have done this, typing “catdv -help” will display a list of available commands.
The CatDV command line interface requires a valid Worker Node license on the machine to run, and automatically picks up configuration details such as the server IP address (as well as the license activation code) from the Worker configuration file on that machine. The following settings are read from the worker config file, so you need to use the Worker Node application to edit these parameters: license code, server IP address, CatDV user name and password used to log on to the server, number of user-defined fields, and date format.
Commands
The following commands are available:
catdv -help, catdv -helpfields, catdv -helpquery
Display a summary of available commands, a list of fields and their identifiers, and information about defining clip queries.
catdv -version, catdv -config
Display the version number of the application or a summary of the configuration information read from the CatDV Worker Node file.
catdv -status
Establish a connection to the server and display statistics about the database.
catdv -getProperty property
Return a server property. Valid property names include ‘version’, ‘startupError’, ‘warningMessage’, ‘isEnterprise’, ‘isRegistered’, ‘regLicense’, ‘regExpires’, ‘catdv.allowAnonymous’, ‘catdv.useRecycleBin’
catdv -groups, catdv -users
Display a list of all the production groups and users on the server, including their ids. (A format and output file can be specified if required, see below).
catdv [query] -catalogs (or -catalogsdetailed)
Display a brief or detailed list of catalogs on the server. If query is omitted, all the catalogs are listed (and the clip count is the total number of clips in each catalog), whereas if a query is specified only those catalogs that contain or more matching clips are shown, and the clip count is the number of clips that match the query. (A format and output file can be specified if required, see below).
catdv [query] -distinct field
Display all the distinct values of a grouping field (such as Bin or Status) that occur in the database (optionally a query may be specified).
catdv [query] -summarise field
Similar to the -distinct command, this displays a list of all the distinct values of a field, together with a count of how many times that value occurs. If a query is specified, then only clips that match the query are considered. (A format and output file can be specified if required, see below).
catdv -thumbnail id
Extract a specific thumbnail image from the database given the thumbnail id (typically obtained from the poster id clip field). Binary JPEG data is returned and the results will normally be redirected to a file.
catdv [-catalog name | -catalogid id] –insertclip field=value …
Insert a new clip into the database. An existing catalog must be specified by id or name. Any number of clip fields can be specified, ideally clip name, type, timecode format, plus media path, in and out points should be specified if known.
catdv query -count
Perform a clip query and display a count of how many clips match.
catdv query [options] -print [field,…]
Perform a clip query and display the matching clips. A list of which clip fields to display can be specified, otherwise a default list consisting of clip id, clip name, tape name, in and out timecode, format summary, and media file path is shown. (A format and output file can be specified if required, see below).
catdv query -print1 field
Perform a clip query and display a single field from all the matching clips. (Unlike the -print command, which returns full details of all the matching clips from the server and then selects which fields to display, this command is optimised to only return the requested data.)
catdv query -deleteclips
Perform a clip query and delete the matching clips, without asking for confirmation (though depending on how the server is configured, clips may be moved to the recycle bin rather than being deleted immediately).
catdv query -set field=value …
Perform a clip query and then update one or more fields of all the matching clips before publishing changes back to the server. Use -set field+=value to append the new value on the end of the existing value for the clip.
Fields and query terms
To specify a particular clip field you can use its short identifier (eg. “NM1”), its display name (eg. “Status”) or its internal numeric identifier, if known (eg. 17).
To specify a query, one or more query terms need to be specified. By default, multiple terms are combined with a logical AND operator (ie. only those clips which match all the query terms are processed). The following query terms are supported:
-name text
Only return clips whose clip name includes the specified text
-anyfield text
Return clips where are any logging or media field includes the specified text. (Logging fields include name, notes, bin and user-defined fields, while media fields also include read-only media metadata fields such as Exif exposure information, ID3 album and artist tags, P2 camera metadata, and similar fields.)
-anylogfield text
Return clips where any logging field includes the specified text.
-groupid id
Only return clips from the specified production group (whose id was returned by the -groups command)
-mediafile text
Return clips whose media path contains the specified text
-clipid id
Return a specific clip given its id
-all
Return all clips in the database, if no other query terms are specified.
-catalogid id
Only return clips in the specified catalog. Use -catalogid 0 to display the contents of the recycle bin.
-catalog name
Specify the catalog by name
-query [modifiers]field=value
Return clips where the specified field exactly matches a particular value.
-query [modifiers]field:op:value
Specifiy a completely general query term, consisting of a field, comparison operator and value to compare against, together with optional modifiers. The following modifiers are recognised: % (make the comparison case sensitive, normally case is ignored), ^ (negate the query term, so only clips which don’t satisfy the condition are returned), * (include this term in a list of terms combined with a logical OR operator, where at least one of the terms must be satisfied for a clip to be returned). Fields may be specified either by name or identifier, as elsewhere. The comparison operator is given by a number, such as 4 for ‘is blank’ or 35 for ‘timecode between two values’. Type “catdv -helpquery” for a full list of comparison operators.
Options
A number of modifier options are available with many of the commands above:
-limit number
Only return the given number of clips at most. (By default, a limit of 50000 clips is applied. Specify 0 to turn off the built-in limit.)
-members
Include all the members inside a metaclip rather than just displaying one entry for the metaclip as a whole.
-format fmt
Specify the format and delimiter when printing results. Use ‘tab’ (the default) or ‘tabNoHeader’ for tab-separated text, ‘csv’ for comma-separated format, ‘bar’ to separate fields with a vertical bar character (|), and ‘xml’ to use an XML format.
-out file
By default, all results are printed to the console, unless -out is used to redirect the output to a specified file (depending on how you invoke the command you can also use shell redirection with the ‘>’ operator of course).
-sort field[,…]
When printing results, sort the clips based on the specified field(s). These need not necessarily be in the list of fields being displayed. Precede the field name with ‘-’ to reverse the sort order.
Examples
catdv -groups
Look up the identifier for a specific production group, for use in subsequent queries
catdv -groupid 12401 -summarise Status
Display a summary of how many clips there are with each status in the given production group
catdv -query U1=Smith -query Status=Approved -format xml > /tmp/smith.xml
Generate a report of approved clips relating to a particular customer
catdv -mediafile DSC01245.JPG -print ID,NM1,MF,P1 -sort -ID1
Display all clips whose media file matches the given name and print a summary, including the poster id. Sort them so the most recently imported file comes first.
catdv -thumbnail 189039 -out ~/Desktop/thumb01245.jpg
Extract the specified poster image to a file.
catdv -query “*U1=Interview” -query “*Bin=Interview” -print
Display clips where either User1 or Bin is “Interview”. When typing certain punctuation characters (eg, *, $, ! etc.) be aware that they may have special meaning to the command interpreter shell and may need to be “escaped” by enclosing them in single or double quotes.
catdv -query ^STS:4: -count
Display a count of how many clips have a status which isn’t blank (operator 4 means ‘is blank’).
catdv -query 108:2:/Volumes/Media -summarise 108
Display a count of how many clips there are in each folder below /Volumes/Media (108 is the numeric attribute id for ‘media folder’, operator 2 means ‘starts with’)
catdv -query U2:4: -query STS:4: -query MD1:22:,86400 -set U2=Peter -set Status=Overdue
Take all clips whose status and assignee (user field 2) are blank and which are more than 24 hours old (MD1 is modified date, operator 22 means ‘older than’, and 86400 is the number of seconds in one day) and assign them to Peter, marked as being overdue.
catdv -query ID:65:11965,11968,11979,11988,… -set ARCHV=”Archived to tape B17”
Update the archive status of a specified list of clips (whose identifiers were determined previously) to indicate that they have been successfully archived to tape. (Operator 65 means ‘is one of’).
Pegasus Worker
This addendum to the main CatDV Worker Node manual covers features specific to Pegasus Worker:
· The new Worker Node architecture, with separate processes for the Worker Service and Worker UI. (This affects all editions of the worker but is particularly relevant to Pegasus Worker.)
· Running the Worker Service as a background system service
· Managing a cluster of worker nodes on different machines using the Worker Monitor dashboard application
· The Pegasus Worker REST API
· Distributed load balancing (worker farming)
· Configuring a containerised cloud instance
· Cloud ingest actions
Worker Node Architecture
Starting with Worker 7 we changed the architecture of the CatDV Worker Node.
Previously, Worker 6 and earlier ran as a desktop user process, with the user interface and the worker engine running in the same process:
· the engine maintains the queue of tasks to execute and has threads to scan a watch folder and to perform server queries and to pick the next task to perform off the queue;
· the user interface displays the task list, has checkboxes to control adding items to the tasks (server query or file watcher threads) or take them off the list (worker threads), and has an editor to let you edit the worker configuration.
As of Worker 7 the user interface and the worker engine are now separate processes, though with a regular Enterprise Worker license in most cases they continue to behave in exactly the same way as Worker 6: when you launch the worker application this starts the UI process and (after a short delay) automatically starts the worker service, and when you quit the UI process that also quits the worker service.
WorkerUI
Worker Service
Task List
Worker Engine
File Watchers
Server Monitors
Worker Threads
SQL
XML
Config file
Log files
The difference is that it is now possible to run the worker service as a background system service, not just as a user session process, so it starts up automatically when the machine starts up and doesn’t require a user to log in and launch the worker. Additionally, it is possible now to remotely administer worker nodes running on another machine.
A major difference from older versions therefore is that the worker can now run in one of two distinct environments, in the logged on user session, or as a background system service:
Local session service
With a Workgroup or Restricted worker node license the worker continues to run as a desktop application within the logged in user session, the same way as it did in Worker 6.
Config files and log files are stored in the same place as before.
On Windows this is typically in:
· C:\Users\<user>\AppData\Local\Square Box\worker.xml
· C:\Users\<user>\AppData\Local\Square Box\Logs\CatDV Worker
(The exact location is based on the %LOCALAPPDATA%, %APPDATA%, or %USERPROFILE% environment variables).
On Mac OS X this is in
· /Users/<user>/Library/Application Support/worker.xml
· /Users/<user>/Library/Logs/Square Box/CatDV Worker
When running as a local session service file access permissions, ownership, mounted drives, and so on for the worker will be as per the user who runs the worker.
Background system service
New in Worker 7 is the ability to install the worker as a background system service so the worker engine runs as root (on Mac/Unix), or the Windows service user with administrator privileges (on Windows). From a technical viewpoint the worker service is installed and runs in exactly the same way as the CatDV Server except that the role of the control panel is now taken on by the worker UI.
When running as a background service the worker config files and log files are in different locations from the local session service.
On Windows they are typically in:
· C:\ProgramData\Square Box\CatDV Worker\worker.xml
· C:\ProgramData\Square Box\CatDV Worker\Logs
(This is based on the %ProgramData%, %PUBLIC%, or %ALLUSERSPROFILE%\Application Data environment variables.)
The CatDV Worker service is listed in the Windows Services control panel and controlled from there, just like the CatDV Server is.
On Mac OS X the config and log files are in:
· /Library/Application Support/CatDV Worker/worker.xml
· /Library/Logs/Square Box/CatDV Worker
The service is started from /Library/Application Support/CatDV Worker/Worker Service.app by /Library/LaunchDaemons/com.squarebox.catdv.worker.plist
On Linux they are in user (usually root’s) home directory and /var/log:
· /root/.catdv/worker.xml
· /var/log/catdvWorker
Installing the background service
Unlike the CatDV Server we don’t have a standalone installer to install or update the background service software. Instead, installing the service is done via commands in the “Service” menu in the worker UI.
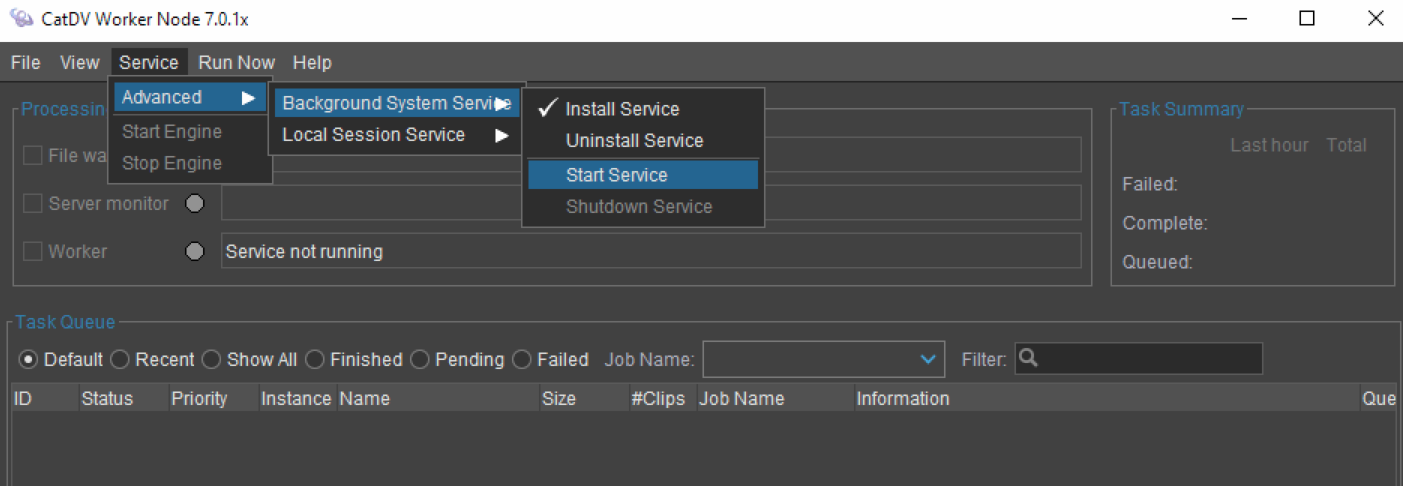
On the Mac a copy of the worker software is installed in/Library/Application Support/CatDV Worker/Worker Service.app. It doesn’t use the one the worker UI was launched from as you could be running from a disk image or a copy of the software in your own home directory. The worker UI prompts you to authenticate when necessary in order to write to the system location and install the launch daemon.
On Windows the worker software is already installed in a fixed location (typically C:\Program Files\Square Box\CatDV Worker 7.0) and so it isn’t necessary to make a separate copy to run it as a background service. Instead, it just needs to register it as a Windows system service so it starts up automatically in the background. To do this, run the worker UI as administrator then do Service > Advanced > Background Service > Install.
If you’re unable to connect to the background service from another machine you may need to add C:\Program Files\Square Box\CatDV Worker 7.0\lib\JavaHelper.exe to the allowed programs in the Windows firewall settings.
Worker service and worker engine states
We have been using the terms “worker service” and “worker engine” more or less interchangeably. They refer to the same process but the distinction depends on what role they are performing.
Even though they run within the same process, there is a logical distinction between the worker “service” (which responds to RMI requests from the worker UI to display the task list and control the engine) and the worker “engine” (the file watcher, server query, and worker threads that do the work). It is possible to start, stop, and restart the worker engine (eg. after editing the worker config file), while the worker service is running throughout.
The worker can therefore be in a number of different states:
· Service not running
If the service process isn’t running you can’t see the task list or administer the worker from a remote machine. You can edit the local worker configuration and view the log files by directly accessing the local files but you need to use the worker UI to start the service before you can do anything useful.
If you are using the background worker service then you can’t edit the config unless the service is running.
· Service running but engine not started
Once the service is running you can see the task list and administer the worker remotely, but the engine won’t start processing tasks until you start the file watcher, server monitor, and worker threads.
In the general section of the worker configuration you can specify whether to start the engine automatically as soon as the service starts or wait until you press the Start button.
You can also get back to this state (service running but engine stopped) once the engine has been running by pressing the Stop button and waiting for the threads to shut down.
· Engine running normally
Once the engine threads start up they start doing their work and you should see three green lights in normal operation.
· Service and engine running but threads suspended
If a fatal error occurs, or if you manually uncheck any of the worker control checkboxes, then the service and engine will both be running but the worker threads are paused until you enable them again. You can do this using the local worker UI or remotely from the Pegasus worker monitor.
Once started the worker service normally keeps running indefinitely, as that is the only way to access the worker from another machine.
If the worker service is shut down or dies for any reason then you will normally need to launch the local worker UI process to start it up again, though if it is installed as a background system service it will normally start up automatically when the system reboots (without requiring a user to log in and start the service manually).
Pegasus Worker Manager
To control Pegasus Worker instances running on other machines there is a new dashboard application, the “PegasusWorker Manager”. After the initial install/setup process, which must be done locally on each worker machine, the Worker Manager provides full remote access and management of the remote Pegasus Worker engine, including:
· Display and edit the task list (delete old tasks, resubmit tasks, change priority)
· Start and stop the engine
· View and control the traffic light status of the different worker threads
· Viewing the log files (from the remote machine)
· Manually run a particular watch action now
· Editing the worker configuration (including seeing worker extensions, file choosers, and user defined fields from the point of view of the remote machine, not the local one the dashboard is running on)
Note: the Worker Manager communicates with remote Worker Node isntances via a network connection, so the worker service to be running on the remote machine.
To enable direct remote access it is necessary to set up a “Service Password” on the worker engine. This is separate from the CatDV user name and password that the worker uses to connect to the CatDV Server and is purely there to protect the worker configuration from remote access.
To permit remote management of the worker you therefore first need to use the local worker UI app to enter a password for that worker instance, and choose what level of remote access to give:
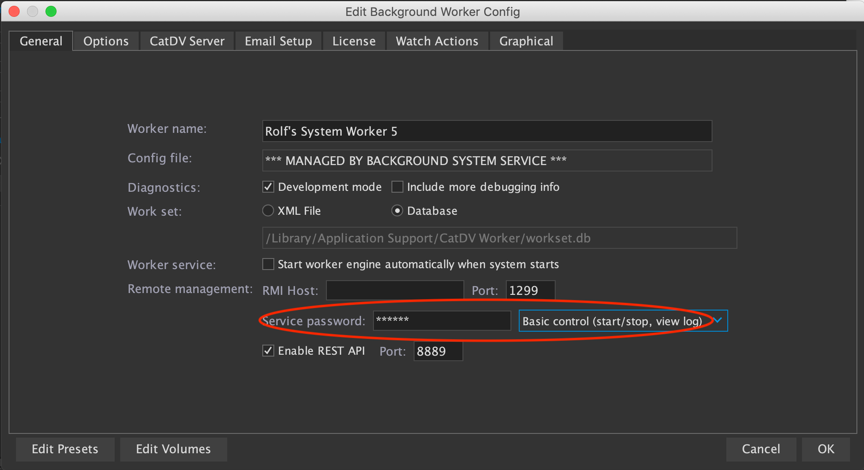
To manage all the workers attached to your local CatDV Server instance, click on New Connection and enter the address (URL) and the CatDV username/password of an admin account on the CatDV Server.
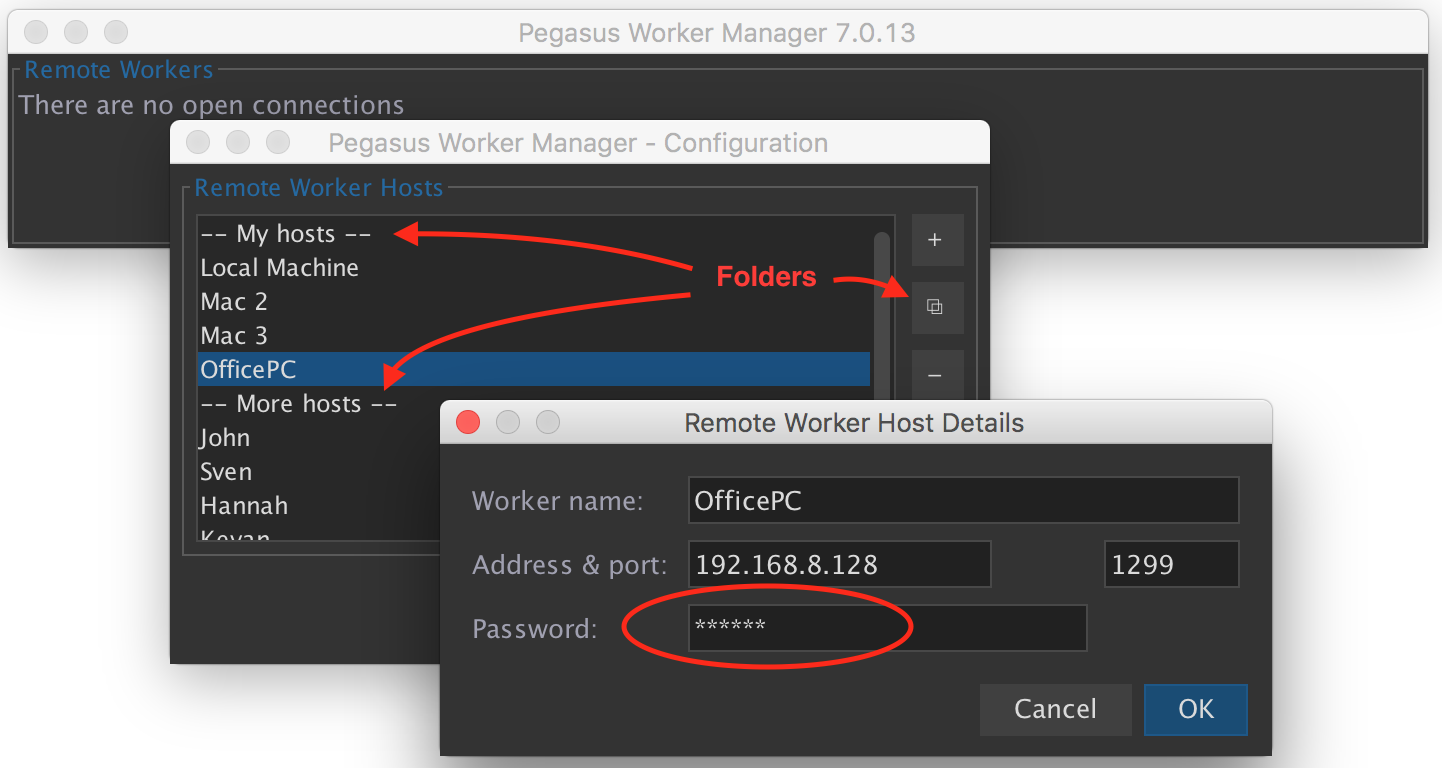
This will add the Server to the SERVERS section of the nav panel. Double clicking the server item in the tree will open the monitor panel, that shows high-level status for all the attached workers. Expanding the tree item will show the attached workers in the tree and double clicking on one of these will open the individual worker panel – which looks mich like the normal Worker UI.
You can then see the status of all the connected workers at a glance, and administer individual worker installations by right clicking to show the pop up menu of available commands. You can also double click on the count of failed or completed tasks to view those tasks.
You can also connect directly to non-local workers by right-clicking on the WORKERS section in the tree and creating a new “Worker Set” (a named collection of remote workers). Then right click on the Worker set and choose Add Worker and enter the Worker’s connection details. Note: the preferred way to manage workers is by connecting to the CatDV Server as explained above – rather than connecting directly to individual workers – but that functionality is retained for now.
Note that you will need a Pegasus worker license for each machine that is to be administered remotely.
Local worker UI
The new Worker Monitor dashboard is specifically designed to administer Pegasus Workers running on other machines and only ever accesses the task list, worker config file, or log files using RMI requests to the service.
By contrast, the regular worker UI uses a mix of direct file access and RMI requests to connect to a worker service on the local machine:
· It views the task list by going via the worker service (so if the service isn’t running the task list will be blanked out).
· It views log files by directly accessing the file system (allowing you to diagnose problems starting the service, or a failure to connect to the service).
· Editing the worker configuration will either go through the worker service (if it is running) or by directly editing the worker.xml file.
If you are using the background system service then the only way to edit the config file is to go via the service (as the config file is owned by the administrator/root user and the worker UI will normally be running as a normal user space process and so won’t have access to the config file).
Basic setup of the worker UI
Use the File > Basic Setup command to tell the worker UI whether you are using the background service or not, and which port to connect to the service on:
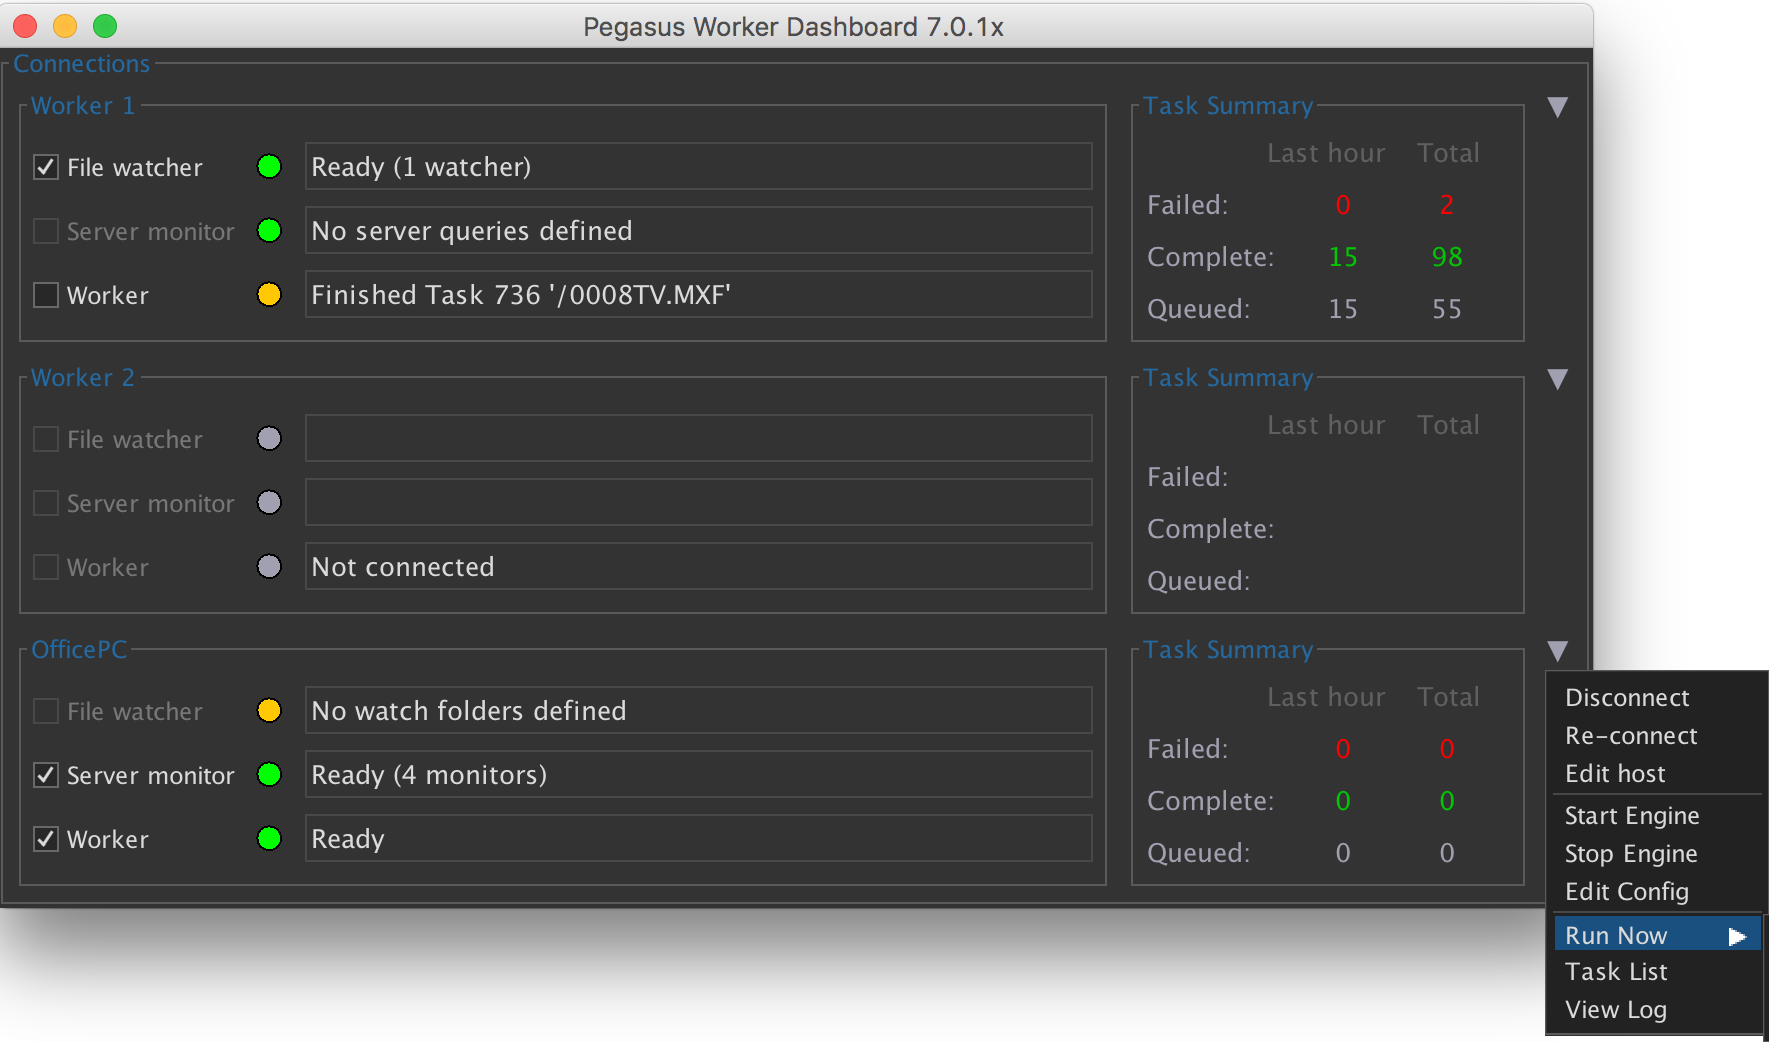
Enter the password that the worker service is configured with.
This connection information is stored separately from the main configuration file in the user’s local workerUI preferences file:
· C:\Users\<user>\AppData\Local\Square Box\workerUI.prefs (Windows)
· /Users/<user>/Library/Application Support/workerUI.prefs (Mac)
Things to watch out for
Because the background service and remote monitoring differs from how the worker used to work there are a number of gotchas and things to be aware of.
Be very clear whether you are using the system background service or the local session service, and to minimise confusion avoid switching between them too much – perhaps even delete the log files and configuration from the other environment. (If you’re not careful then depending on how you launch the UI and whether the service is running or not it’s conceivable that you might see the task list from one environment and old log files from the other, for example.)
It’s highly recommended that you don’t ever change the port from 1299. It’s confusing enough that you can have the worker running from two different locations and under two different user accounts, but having a fixed port number at least ensures that only one or other of the instances can be running at a time!
To install the background system service you need to authenticate as Administrator. Under Windows, right click on the application and choose Run As Administrator. On OS X launch the UI as normal and use the Service menu to install the background service and you will be prompted to enter an administrator password.
The worker UI communicates with the worker service using Java RMI, in exactly the same way as the CatDV desktop app talks to the CatDV Server. Similar issues apply therefore, in that ideally you need to tell the server (ie. the worker service) what IP address clients (ie. the Pegasus Worker dashboard running on another machine) will use to access the server. This is less critical now however as we use the same brute force method to rewrite the IP address of the remote server object as we started doing in the client, so in most cases it should work even if you leave the host address blank in the worker config.
There are bootstrapping issues and contradictory requirements which complicate the situation. For example, if you’re using the local service it is necessary to be able to edit the config file before the service is running, in order to enter initial license codes, port numbers, etc. But if you’re using the background service you might not have write access to the config file directory other than via the service, so you need to install and start the background service first before you’re able to edit the configuration!
When you first install the background service it won’t have its own config file and so when you edit the background service configuration for the first time it will import any settings and watch actions from the local configuration (including the location of the workset file, so you may want to change that). You can only see and edit the background system service config file when the background service is running, so take care not to use the worker UI to try and edit the config when the service is not running otherwise you may get confused because you see the old contents of the original local config file.
Licensing requirements
To run as a background system service you need a Pegasus Worker or Enterprise Worker license (not Workgroup Worker or Restricted Worker)
You don’t need a special license code to run the Worker Monitor application but you can only connect to Worker Nodes on remote machines if they have a Pegasus Worker license. (If you’d like to test the Worker Monitor you can use it to connect to a worker on the local machine even if it doesn’t have a Pegasus Worker license.)
Pegasus Worker has other additional features, most notably it supports worker farming using the distributed load balancing option, where several workers on different machines can coordinate their work and only pull one item at a time to work on from the queue on the CatDV Server.
REST API
If you have a Pegasus Worker license you can use the new REST API to remotely monitor the status of the worker, query the task list, and even remotely submit jobs for processing. The REST API is designed for use by the CatDV pro services team or by third party systems integrators. It is provided as an alternative remote monitoring tool to the Worker Manager app. Both remote monitoring technologies require a Pegasus License and you can use either or both depending on your requirements.
The REST API is disabled by default. To use it you need to enable the REST service by checking the option at the bottom of the General tab of the worker config editor, and also select the port to use.
The following request endpoints are available in the REST API:
GET http://localhost:8889/info
Display basic version information about the worker to confirm the REST service is running.
{"status":"OK", "data":{"version":"CatDV Worker Node 8.0b6"}}
GET http://localhost:8889/status
Display the current status of the worker:
{"status":"OK", "data":{"status":{"seqNum":75, "systemService":false, "running":false, "shuttingDown":false, "message":"Engine stopped", "enableFileChk":false, "fileChk":false, "fileColor":{}, "fileMsg":null, "enableServerChk":false, "serverChk":false, "serverColor":{}, "serverMsg":null, "enableWorkChk":false, "workerChk":false, "workerColor":{}, "workerMsg":"Engine stopped"}, "summary":{"message":" Total 766 tasks (713 Queued, 1 Failed, 51 Complete, 1 Skipped), 9 batches", "numComplete":1, "totalComplete":51, "numFailed":0, "totalFailed":1, "numOffline":0, "totalOffline":0, "recentlyQueued":0, "totalQueued":713}}}
You can also display it formatted as a summary message using http://localhost:8889/status/summary
{"status":"OK", "data":"Complete: 1 / 51\nFailed: 0 / 1\nOffline: 0 / 0\nQueued: 0 / 713\n Total 766 tasks (713 Queued, 1 Failed, 51 Complete, 1 Skipped), 9 batches"}
GET http://localhost:8889/tasks
Without any other parameters the tasks endpoint returns the default list of tasks. If you provide the address of a specific task it will return details for that task, eg. http://localhost:8889/tasks/606 :
{"status":"OK", "data":{"id":606, "process":1, "status":4, "priority":2, "instance":"Rolf-Touchbar.local-20190109-234657-0", "bookmark":"Helper1 20190110-0827.log:127", "filesize":194389, "name":"TestSequences.cdv", "mtime":{}, "lastSeen":{}, "root":"/Users/rolf/Media/UnitTestData", "filename":"/TestSequences.cdv", "numClips":1, "jobname":"Watch UnitTestData", "batchID":null, "online":null, "remoteClipId":117478, "remoteClipSeq":0, "queued":{}, "lastUpdated":{}, "details":"Import as Generic File, resulting in one clip, type Other (non-media file), duration 0:00:00.0\nPublished to 'Auto Publish 2019.01.10 08:27'\nRemote clip ID 117478\nTask took 3.8s"}}
You can filter the task list looking for all the tasks relating to a particular job, containing text in the filepath or details description, or belonging to a particular batch of tasks submitted in one go.
http://localhost:8889/tasks?filter=xxx http://localhost:8889/tasks?jobname=xxx http://localhost:8889/tasks?batch=nnn
PUT http://localhost:8889/tasks
You can change properties of a queued task by submitting a PUT request with a JSON payload containing the following properties:
action: ‘resubmit’, ‘hold’, ’resume’ or ’update-priority’
taskIDs: <array of task IDs that the action applies to>
The update priority call requires an additional parameter:
priority: <numerical value 0=lowest – 4=highest>
DELETE http://localhost:8889/tasks
The delete action deletes the tasks whose IDs are specified in the taskIDs property of the JSON payload.
POST http://localhost:8889/submit
Finally, a remote system can directly submit server query or watch folder tasks to the worker task list or queue a scheduled job immediately. In each case, you need to specify the job name, and either the server clip id or file path as appropriate.
The job you pass in can be disabled from normal running so it only runs if explicitly submitted via the REST API.
To allow tasks to be submitted remotely via the REST API you need to enable those job definitions that are intended for remote use by adding an allow.submit line to the Advanced Properties in the worker config, for example allow.submit=Job Name 1,Job Name 2
You should POST a JSON object detailing the files or clips to queue, for example
{jobName:"Upload files", files:[ "/Media/File1.mov", "/Media/File2.mov" ]}
{jobName:"Process clips", clipIDs:[ 12345, 12346 ]}
{jobName:"Upload files", file:"/Media/File3.mov"}
{jobName:"Process clips", clipID:12347, userID:151}
{jobName:"Scheduled job"}
In each case it will return a batchID that you can use to get the latest status of those tasks
{"status":"OK", "data":{"batchID":1283}}
For convenience of testing you can also submit a task using GET but this isn’t recommended in normal use because the parameters are visible in the URL and you can’t pass a list of files or clipIDs.
You can associate a task with a specific userID if known.
Worker farming
With a Pegasus Worker license you can have several worker instances in a cluster work cooperatively on the same list of jobs.
Rather than using the task list, which is local to each running instance, the database on the CatDV Server is used to coordinate the different instances.
On your server query panel check the “Automatic distributed load balancing” option:
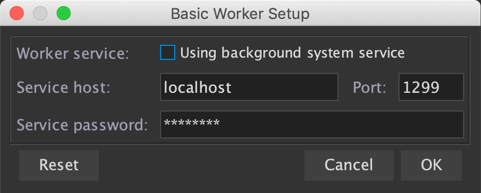
If this option is selected then when the server query runs, rather than “grabbing” all the matching clips that need to be processed and adding them all to its task list in one go, the worker will only grab one at a time and will mark it as “being processed” on this instance. If you have several workers all running the same query against the server they co-operate to ensure that only one worker instance can grab each clip. If a clip is already being processed on one instance and this worker has spare capacity it will automatically move down the list and take the next clip that is eligible to be worked on. In this way multiple Pegasus Workers will automatically divide up the work between them with no risk of conflicts because two are trying to update the same clip at the same time.
This process is managed automatically by all the workers running the same query (and same job name) that have the worker farming option enabled. You can see which worker is currently working on any particular clip by looking the “Worker Farming Status” (squarebox.worker.farming.status) clip field. In rate situations you might want to reset that field yourself. For example, if a job fails on one particular clip (perhaps the file is in a format that your transcode preset doesn’t support) then there is no point repeatedly processing the same file over and over again and failing each time, so once it has failed on one worker node the clip won’t be looked at again for 24 hours unless you clear that field.
It isn’t necessary for all the worker node instances in a cluster to have all exactly the same watch definitions as each other. For example, one instance might be there to handle ingest (indexing of watch folders) and another performs archiving, but they both have one common watch action that uses the worker farming option to do transcoding as a low priority background activity.
Containerised cloud deployment
If you use a containerised environment such as Docker you can store the worker configuration on a CatDV Server. This makes it easy to start up a new worker instance as you simply have to specify a few environment variables which allow the worker to connect to your server from which it will load its configuration. (Please note that the task list is still stored in local storage on that container instance, so if you terminate it and then re-create it, it will start again with a blank task list).
You use the Pegasus Worker Manager dashboard to edit cloud configurations.
First, define the CatDV Server(s) you are using by entering hostname (or http url), user name and password in File > Cloud Servers, then do File > Cloud Configs to edit the worker configurations saved on that server. (It's done this way because you might have several servers and worker installations you're trying to manage). Use + and - to add or delete configurations, or the left arrow to import an existing worker.xml config file. You can save several configurations, eg. 'Ingest Node' and 'Transcode Node'. You'll get the regular worker config editor to edit these.
To tell a worker instance to use one of the cloud configs you need to set several environment variables when you deploy the instance:
SERVERHOST | host name or url of the server (must be specified) |
SERVERUSER | user name to connect (defaults to Administrator) |
SERVERPASSWORD | password to connect (defaults to blank) |
CONFIGNAME | which cloud configuration to use if there are more than one (may be left blank if there's just one on the server) |
WORKERID | unique name of this instance (must be specified) |
REGUSER | worker license details (defaults to the license specified in the cloud config file) |
REGCODE | worker license details (defaults to the license specified in the cloud config file) |
SERVICEPASSWORD | the password used to enable remote management of the worker instance (defaults to the one specified in the cloud config file) |
SERVICEPORT | the port on which the worker service will listen for remote management REST connections (defaults to 8889) |
Cloud ingest actions
You can monitor an S3 bucket or other remote volume such as an FTP site and sync files there with a catalog in the same way as a quick folder scan works.
First, you need to define one or more “remote volumes”, including the type of file system and credentials (URL, user id, and password) to access this. Depending on the type of file system (curl, Amazon S3, Backblaze etc.) the URL might be referred to as a bucket or endpoint, the user id might be referred to as a key or access key, and the password as a secret key or application key.
Give each remote volume a unique identifier. This is shown using a special square bracket notation within media file paths and tells the worker how to access the remote file.
You are now ready define a cloud ingest action:
This will result in clips in your catalog whose media file path use this notation, eg. [SupportFTP]/pub/upload/file1.mov. These won’t be directly playable in the desktop but you can define media path mappings or media stores that map from of these remote volumes to a local proxy volume. Additionally, with CatDV Server 8.1 you can define remote volumes and so it can directly download or play such files.
At this point the clips haven’t yet been analysed, so you would normally follow this by a server-triggered watch action to perform media analysis and build a proxy:
The ‘download remote files’ option tells the worker to download a copy of the file to a temporary cache on local storage so it can process the file if it encounters a remote file with square brackets. Don’t forget to set a failure action to prevent the same file being processed again if there is an error.
To avoid egress fees you may be able to run a cloud worker instance in the same cloud environment as your storage. Please check with your cloud provider for their specific pricing structure
JavaScript filters
It is possible to customise file triggered watch definitions so that JavaScript is used at the time the trigger itself runs (ie. before a job is queued and runs) to determine which folders are scanned and whether a particular file should be processed. It is even possible to dynamically specify the list of files to be queued without scanning a physical directory at all.
To do this, add JavaScript Filter from the special actions section and define one or more of the following functions:
expandRoots(root)
Return an array of root watch folders to scan. The watch folder that this watch action was originally configured with is passed in for reference but in most cases isn’t used.
acceptsFile(file)
The file path of a file that was found in one of the watch folders (and has passed other checks such as making sure the file is no longer growing and matches any file conditions such as an include or exclude regex) is passed in for validation. Return true or 1 to accept the file.
filterFiles(files)
If you need to filter the whole set of files that are found in one go (perhaps because you’re processing a complex camera card hierarchy or similar) you can filter the entire collection and remove or even add files as required. An array of file paths is passed in and returned.
generateFiles()
For complete control you can explicitly specify a set of file paths (as an array of strings) which the watch folder file trigger should return. This can even include remote file paths which don’t exist on this system.
For example, you could have a script such as
function expandRoots(oldRoot)
{
var paths = []; var reply = CatDV.callRESTAPI("catalogs",
{"query":"((catalog[is.new])eq(true))"}) reply.data.forEach(function(catalog) { paths.push(catalog.fields["watch.path"]); }); return paths;
}
Avid Integration
The preferred way to import media, clips, and sequences from Media Composer into CatDV is to directly import the AVB bin files. You can do this by manually dragging them into the Pegasus desktop client or by creating a worker watch folder action with the AVB Folder Sync importer selected.
An AVB Folder Sync job will analyse the contents of all the bin files in the given folder and add any new clips or sequences, and update existing ones, to the CatDV database. (To prevent unintended data loss it won’t automatically delete them from the database if they are deleted from the bin however.)
To create a catalog structure in CatDV that matches the Avid project and bin names you can use the following pattern:
Avid Projects/$b[-1]/${clip.bin}
For AMA-linked clips the worker can read the path to the media file and so generate thumbnails, while for imported media you may need to tell the worker the location of your Avid MediaFiles folder(s) using the MXF Search Path button.
Typically the AVB Folder Sync action would set a clip field to trigger a subsequent server-query triggered task to build proxies for the clips so they can viewed in the web interface.
Avoid re-analysing the clips as that will overwrite metadata needed to relink to the clips in Media Composer. If you need to rebuild thumbnails you can choose the special Rebuild Thumbnails importer from the drop down which will only update the thumbnails without doing a full analysis.
You can then then take clips and sequences that have been ingested in Media Composer and re-use them in other projects, or add markers and log notes, and create subclips and sequences, in the CatDV desktop or web interface and send these back to Avid by exporting an AAF file from Pegasus.
Support
Please contact your systems integrator, email [email protected], or visit our web site at http://www.squarebox.com if you have any questions or require technical support for this product.
Square Box Systems Ltd
The Lightbox Willoughby Rd Bracknell RG12 8FB United Kingdom
Copyright © 2006-2023 Square Box Systems Ltd. All rights reserved.