Technical Note: The CatDV 13 Advanced Exporter
The CatDV Advanced Exporter combines a variety of technologies to allow pretty much any media file that CatDV can import and play to be transcoded to a proxy or other target format.
The following encoders are available:
· FFmpeg encoder that supports a wide variety of container formats (including MP4, MOV, MXF, MPEG, etc.) and codecs (including H264, H2645/HEVC, Motion-JPEG, VP9, DV, MPEG, and Uncompressed)
· FFmpeg Passthrough encoder, to create a consolidated file of a subclip without re-encoding the media
· Native Apple ProRes encoder, to create a ProRes QuickTime movie (including 4444 XQ) using the official Apple SDK
· Native AVFoundation encoder to create ProRes or H264/H265 MOV or MP4 files (Mac only)
· Native Media Foundation encoder to create H264 MP4 or Windows Media WMV files (Windows only)
· Tin Man encoder to create QuickTime reference movies or DNxHR MXF files (requires third party “Tin Man” application and license from Calibrated Software)
· Film strip exporter to create a special long thin filmstrip image used by the web client to do scrubbable thumbnails
· Multitrack audio proxy exporter to create a separate file for each audio track (or each audio channel) for use in the web client
In most cases the selected encoder can directly transcode the source file that you pass in, but if necessary any of CatDV’s advanced players and decoders will be used to decode the source file first, and then pass the intermediate decoded frames to the encoder. This is used when transcoding from RED, DPX, ArriRAW, or Sony RAW, for example. (Use of a particular decoder may require a Pegasus or MXF license, or a copy of Tin Man, but the requirements are basically the same as to play the file – if you can play it, you can transcode it).
Unless you choose one of the direct transcode options (see below) the file is transcoded in segments. The clip is split into segments and each segment is transcoded separately and then concatenated. The video and audio are also transcoded separately and then combined to form the final movie.
This ‘divide and conquer’ approach is more robust and gives a lot of flexibility, for example it lets you transcode a sequence combining source clips of different formats, or to burn in markers.
How to configure the Advanced Exporter
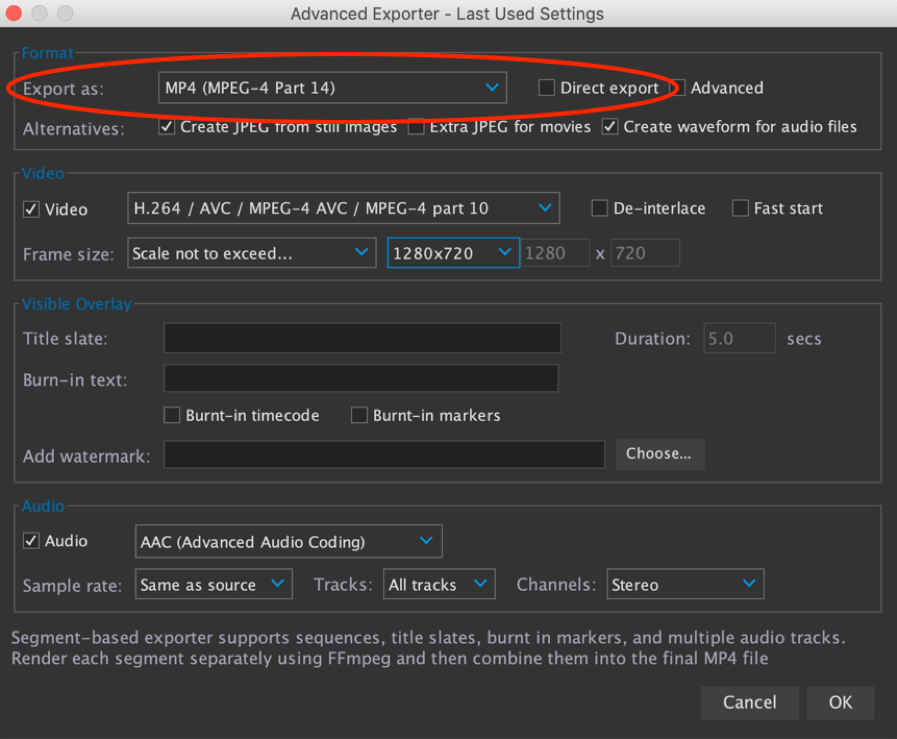
First, use the ‘Export As’ drop down to choose the target container format and encoder to use. You can either select a specific encoder, like Tin Man or AVFoundation, otherwise FFmpeg is used.
Then, decide whether to perform a direct transcode or not.
Check the ‘Direct export’ to have Tin Man or AVFoundation or MediaFoundation directly create the final output file, otherwise the selected encoder is used to encode the video segment(s) to an intermediate file, and FFmpeg is used to encode the audio and do the final muxing (i.e. to combine the video and audio and produce the final output file).
Each approach has its own advantages and disadvantages – a direct transcode may be more efficient in specific situations, but is less flexible in general.
Once you have selected the container format, encoder, and whether to do a direct transcode, that defines the code path that is used and determines the other options you have available, such as which video and audio codecs to use, whether to burn in any text, and so on.
Video and audio codecs
The core FFmpeg exporter supports a very wide variety of codecs and container formats. Many of these are very specialised or old legacy formats and not very useful in most situations, so unless you tick the ‘Advanced’ checkbox only the more commonly used formats are shown.
The AVFoundation exporter supports MOV and MP4 files in H.264, H.265/HEVC, Photo JPEG, or Apple ProRes (basic variants only).
The Media Foundation exporter also supports MP4 files in H.264 or H.265 as well as WMV/ASF files with WMV9 codec.
The Tin Man exporter supports QuickTime reference movies, QuickTime movies in ProRes or DNxHD, and MXF files in ProRes or DNxHD/DNxHR. Both Op1a (video and audio combined in one MXF file) and Op-Atom (video and audio in separate files) can be created.
‘Tin Man Avid MXF’ creates Op-Atom MXF files using the official Avid SDK. If you export these files to the Avid MediaFiles folder, and check the ‘Re-import resulting file as a new asset’ option in the Export Movie dialog, you can drag these to Avid Media Composer as an AAF file and directly send new files to Media Composer.
Choice of codec
For playback on the web, an MP4 file containing H.264 video and AAC audio is the best and most standard choice. The FFmpeg libx264 encoder is a very fast, very high quality software-only encoder, and the Fraunhofer FDK AAC encoder is the best quality audio encoder, so these are the best choices in most circumstances.
You can also use the native AVFoundation and Media Foundation encoders to create an H.264/MP4 file, and on modern hardware this may make use of the platform’s GPU acceleration. You should test which encoder and bit rate or quality settings gives the best combination of visual quality, file size and transcode speed for your purposes.
For use in post production, or as a mezzanine file format, then Apple ProRes or Avid DNxHD/DNxHR, in either MOV or MXF files, are usually the best choices. Which to use depends on which platform you are on and which NLE you use.
Quality and bit rate settings
Most audio and video codecs let you specify a quality setting depending on whether a smaller compressed file size or better visual quality is the most important factor for you.
There are several different ways to specify the desired quality and bit rate, depending on the codec:
· Some exporters, like the Apple ProRes or Tin Man DNxHD exporters, have different profiles or presets that you select from a drop down
· Most FFmpeg codecs, and the AVFoundation or Media Foundation H.264 and H.265 exporters, let you specify a target bit rate in kilobits/second. If you leave it on the Auto setting then that will use ‘as much as needed’ and may result in unnecessarily large files, whereas if you set an explicit number then a value that might be right for one resolution might be inappropriate for another, so you should do some tests to find the most appropriate bit rate for your preferred format and resolution.
· Some FFmpeg codecs support a relative quality scale from 0 to 31. Consult the online FFmpeg documentation for the appropriate values to use for a particular codec.
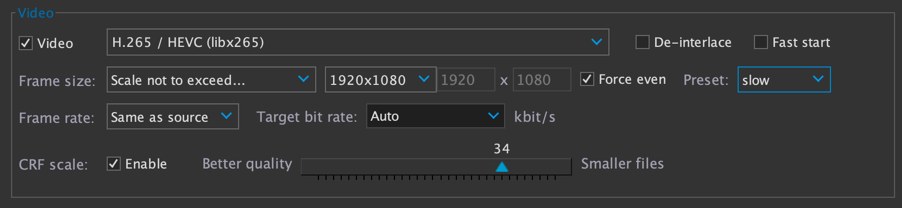
· The FFmpeg libx264/libx265 codecs use a CRF (constant rate factor) scale that specifies the visual quality you want to achieve and automatically adjusts the bit rate accordingly. Good values for H.264 are in the range 18 to 32, and for H.265 in the range 22 to 36. You can also specify an encoding preset which tells the encoder how hard to try to optimise the output, at the expense of longer encoding times.
· The Fraunhofer FDK AAC codec uses a VBR (variable bit rate) preset from 1 to 5 to target a particular subjective quality
It is very difficult to make blanket recommendations about the settings to use, so you should always do some tests to work out what settings are best for your particular requirements.
Video scaling and other options
When exporting a video you can either preserve the existing movie dimensions, or scale it up or down to a desired output size. Unless you specify an exact output size the original aspect ratio of the movie is normally preserved to fit within the desired dimensions.
Use ‘Original size (square pixels)’ if the original movie has non-square pixels and you want to render it out at a similar size but using square pixels.
Check the ‘Force even’ option to make sure the calculated horizontal and vertical dimensions are a multiple of 2. This is necessary when transcoding to H.264 and other formats.
If you are transcoding interlaced source material then either tick the box to apply the FFmpeg de-interlace filter or use the ‘Single field/half height’ option (or both), otherwise the output movie will suffer from jagged interlace artifacts if there is any motion. You can also choose ‘Halve, not to exceed’ to scale down to the target size by exact powers of two, which has a similar effect but gives you more control.
Use the ‘Fast start’ option when exporting MP4 and MOV files for use on the web. This takes slightly longer to do the transcode but will move the movie header to the start of the file to support ‘progressive download’ and allow the clip to start playing before the whole file is downloaded.
Alternative outputs (still images, audio wave forms, PDFs)
If your export action is designed to work on arbitrary media files then it doesn’t necessarily make sense to generate the same kind of movie for all input file types. You can tell the exporter to handle still image and audio only files differently, and automatically create a JPEG file instead for still images, or an audio waveform movie for audio only files.
You can also use the ‘Extra poster JPEG for movies’ option create a full-resolution still image of the poster frame at the same time as exporting a movie. This is useful for the CatDV Web Client which will use this JPG file as a thumbnail image before playing an MP4 or MOV proxy from the same location.
You can use the “Film strip” format (one of the options under Export As) to create a special film strip image for use in recent versions of the CatDV Web Client. It consists of thumbnail frames taken at regular intervals throughout the movie and placed side by side to form a single very long and thin image. To work with the Web Client each frame must be 160x90 in size. The number of images is calculated from the duration by specifying a number of frames per second to use, within the specified minimum and maximum count:
For PDFs, if you check ‘Create movies for other files’, the exporter will create a movie showing each page of the document as a separate frame so you can step through it in your player (in the Web Client for example). Normally it will use the specified output format (e.g. H264/MP4 for use in the web) but if you check the ‘Direct export’ option it will create a MotionJPEG MOV file without an extra re-compression step, resulting in slightly better quality but a file that won’t play in web browsers.
When transcoding an audio only file the ‘Create movies for other files’ creates a visual representation movie with a scrolling audio waveform and overlaid frequency plot of the audio.
Visual overlays
If you are using FFmpeg to render out the video you can include various types of burnt-in visual overlay:
· Use a transparent PNG or GIF image containing a channel logo (or bug) or a copyright notice or similar that will be superimposed on every frame
· Add burnt-in timecode
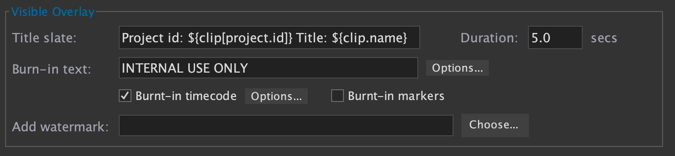
· Add fixed burnt-in text, such as a copyright notice or the title of the clip, which can come from a clip variable expression such as ${clip.name}
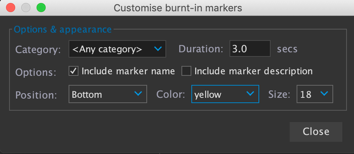
· Add burnt-in marker text, either the marker name or description or both. This will result in an overlay that varies over time (for example to show subtitles). You can include all markers, or only markers of a certain category.
You can configure the size, position, and colour of the burnt-in text and timecode. In the case of markers the ‘automatic’ setting means the text will use the colour of the marker category.
Title slates
If required you can automatically prepend a ‘title slate’ to exported movies, including fields such as the project and clip name, delivery format, etc. which are automatically taken from clip fields.
Basic formatting is supported by specifying the foreground and background colour of the text, as well as the position and size of the text and the font to be used (within square brackets at the start of the text). Alternatively, for finer control, you can use HTML formatting by starting the title slate text with an <html> tag.
If requested we can also animate a custom leader including a countdown timer, 2-pop tone etc. but this requires scripting by our pro services team.
Audio mapping
Most media container formats (certainly MOV and MP4 files, but others also) arrange audio in ‘tracks’ and ‘channels’. A movie might have one video track and one stereo sound track, or maybe several sound tracks for different languages; rather than two stereo tracks it might have four mono tracks, or one 6 channel surround sound track, and so on.
If you use the regular advanced exporter (not a direct transcode) then you have a lot of flexibility to go from different source audio track combinations to different output combinations.

The most common options are to: preserve all the tracks and channels of the input; to create one stereo or mono track; or to use one of the special options:
· “Mix down” to combine all the audio tracks into a single stereo or mono audio track.
· “Smart stereo” means copy the input layout, so stereo goes to stereo, surround sound to surround sound, a single mono track to a single mono track, unless there are two or more mono input tracks, in which case the first two channels are automatically combined into one stereo output track.
· If you combine “Mix Down” with “Smart Stereo” it will produce a single mono or stereo track combining all the inputs (see below for details).
You can explicitly create any combination of tracks and channels however. Choose the number of audio tracks, and the number of channels per track, and the exporter will try to create audio with that layout.
Effectively, all the source channels are enumerated in order, regardless of which track they are in, and then ‘flow’ into the output channels in order. Silent ‘filler’ channels are added at the end to make sure the specified layout is met if there aren’t enough inputs.
For example, let’s say you configure the output format to always have two stereo tracks, and then pass in four different source movies with: 3 stereo tracks, one mono track, 8 mono tracks, or one 5.1 surround sound track respectively. These four input files will be treated as follows:
a) L1/R1; L2/R2; L3/R3 → L1/R1; L2/R2
b) A1 → A1/A1; 0/0
c) A1;A2;A3;A4;A5;A6;A7;A8 → A1/A2; A3/A4
d) FL/FR/FC/LFE/BL/BR → FL/FR; FC/LFE
In this notation semicolon separates tracks, and / separates left and right (or other channels) within a single track. (We also use + to indicate where channels are combined into one into one by simple mixing, and 0 to indicate a silent channel.)
If you don’t like the default mapping then you can renumber the inputs by adding a special line such as “audiomap=2,3” to the advanced options. This will select inputs 2 and 3, where all the channels are numbered starting from zero regardless of which track they are in and so for the first example above L1=0, R1=1, L2=2, R2=3, L3=4, R3=5 etc
If you use the “Mix down” setting (together with “Smart stereo”) then it will combine all the tracks to a single mono or stereo track, for example:
a) L1/R1; L2/R2; L3/R3 → L1+L2+L3 / R1+R2+R3
b) A1 → A1
c) A1;A2;A3;A4;A5;A6;A7;A8 → A1+A3+A5+A7 / A2+A4+A6+A8
d) FL/FR/FC/LFE/BL/BR → FL+FC+BL / FR+LFE+BR
Passthrough exporter
The special “Pass through” setting will copy the media between the selected in and out points without re-transcoding it. This is useful to create a new file with just the media for a subclip or sequence very quickly without any loss in quality (similar to the Pegasus “Consolidate Media” command) but isn’t guaranteed to work correctly for file formats like H.264 which use inter-frame compression if you don’t cut on an I-frame or exact GOP boundary.
Multitrack audio proxies
To allow the web client to switch between different audio tracks for a movie you need to create a separate file for each audio track (and set up a suitable path mapping in your media store definitions). The multitrack audio proxy exporter does this.
The recommend/supported formats are WAV with uncompressed PCM encoding, or M4A with AAC encoding.
By default, one output file is created for each audio track in the input, with the same channel layout as the source. The files are numbered _1, _2, and so on (e.g. A001B002_1.wav). You can force the layout to stereo or mono, or use smart stereo to combine pairs of mono tracks into one stereo file.
The common situation where the source file has one audio track but with multiple audio channels is handled specially. If you choose mono from the channels drop down then one file is created for each audio channel in that track.
You can further tune this process by adding rules to the advanced option consisting of number of channels then how to combine the audio channels into files, and how to name them. For example “8:6+2 6:2+2+2 4:2+2” means an 8 channel input will result in two output files, one with 6 channels (5.1 surround sound) and a stereo file, while 6 and 4 channels will be grouped into 3 or 2 stereo files respectively. Or let’s say a movie has 6 audio channels representing three stereo soundtracks in different languages, and we don’t need to output the first one to its own audio file because that’s already included in the proxy movie, you could then write “6:2_discard+2_es+2_fr” to skip the first pair of channels and write two files called xxx_es.wav and xxx_fr.wav
Advanced options
In the advanced options field you can enter additional FFmpeg options to modify the behaviour of the transcode, including:
filext=xyz Override the default file extension that will be created (normally the correct extension for the chosen container format is used)
-metadata none Turn off default metadata (by default the title is set to the clip name)
-metadata xx=yy Set other metadata fields such as author, copyright, etc. (see FFmpeg documentation for a complete list)
-timecode xx Set the start timecode, or ‘none’ to turn it off
fontfile=xx Change the font for burnt in text (eg. /Library/Fonts/Helvetica.ttf)
-pix_fmt xx Change the pixel format, or ‘none’ to turn it off
-vf xx Apply a video filter. This will be merged in with other filters. (e.g. -pix_fmt yuv420p -vf scale=in_range:full:out_range:limited to change the format to something that the h264_nvenc hardware accelerator supports).
-profile xx Apply a video transcoder profile (eg. 'dnxhr’) that may be needed by certain container formats or codecs
-xx:v yy Apply other video options (eg. “-b:v 120M”)
{V}xx, or {V0}xx Apply other options to video command line (eg. “{V}-target {V}ntsc-dvd” if you’re creating a DVD VOB file)
audiomap=p,q,r,s Choose which audio channels to include, and in which order
audiotracks=N Set the number of audio tracks
audiochans=N Set the number of audio channels per track
rotate=angle Normally the movie is rotated automatically according to the orientation set on the clip, but you can forcibly set a specified angle (or set rotate=0 to turn off any rotation)
-movflags xx Set additional movflags (you no longer need to set faststart this way as it now has its own option)
-af xx Apply a final audio filter (eg. “-af aecho=0.8:0.9:1000:0.3”)
-xx:a yy Apply extra final audio options (eg. “-b:a 128k”)
{A}xx, or {A0}xx Apply other options to audio command line
s/xx/yy/ Apply a regular expression replacement to the FFmpeg command line, eg. the following option will change burnt in text to have a solid background box rather than an outline border round the characters:
s/borderw=1/box=1:boxborderw=4/gs/bordercolor/boxcolor/g
Arbitrary advanced FFmpeg options can be included if you use the direct FFmpeg exporter, but the regular segment exporter only processes known options where it knows which step they relate to.
If the advanced options field starts with javascript: then the options are calculated dynamically by evaluating the javascript expression.
You can preview the command(s) that will be used, and the result of applying a regex (or other options), by using the ‘Test’ button.