Worker 9 Architecture
This tech note discusses the various different ways the CatDV Worker Node is launched, configured, and monitored.
This is somewhat complicated as we struggle to balance a number of competing requirements:
· backward compatibility and flexibility (we support different modes of operation, everything from standalone to fully containerised cloud deployments, under both local and remote management, and also the old Essential and new H4000e integrated installations)
· security (the worker runs as a privileged process and so only authorised users can be allowed to change the configuration, plus we have the complexity of having to support 2FA)
· bootstrapping issues (how to connect to or configure the worker the first time before a license, password, or server host name have ever been entered)
· the need to enforce licensing (e.g. remote management should only be available with a Pegasus Worker license)
· trying to make it as easy as possible to set up and configure.
Deployment modes and where config is stored
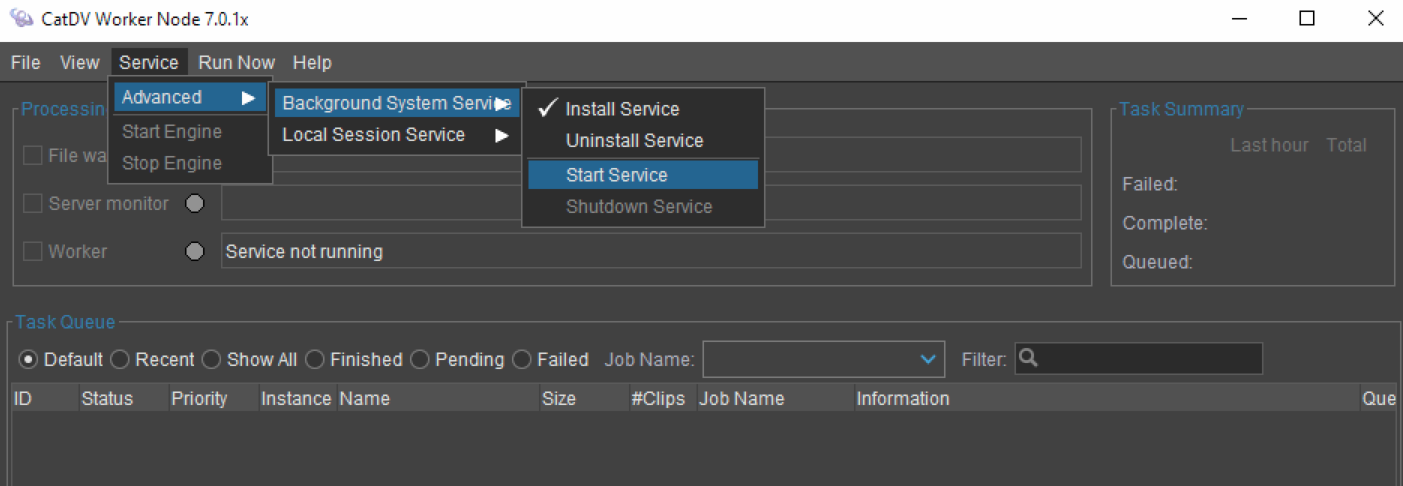
The worker service can run as a “local session service”, which is started manually from the Worker UI as another user process, or a “background system service” which starts up automatically when the system is rebooted and runs as a background system user (typically root).
For both the local session service and background system service cases the worker configuration is stored in a config.xml file (in the user’s home directory or a system directory respectively) which is read when the service first starts up or is restarted.
The worker can also be launched as a “cloud service” (usually from within a docker container) by specifying the server host name, user id, password and a config name via environment variables, in which case it loads its configuration from the server (stored as an XML blob in the ‘settings’ table) with certain parameters such as the license also being overridden via environment variables.
Management API (Worker 8)
For local operation the Worker UI app is used and talks to the Worker Service (separate processes on same machine) using a Java RMI API (typically on port 1299). This API is also used in Worker 8 when the service is managed from another machine using the Worker Manager app.
Separately, the worker service implements an HTTP REST API (typically on port 8889) which is used by the worker dashboard in the web interface. The REST API is more limited and primarily supports monitoring (state of the three checkboxes) and displaying the task list.
Like the CatDV Server, the worker implements “RMI-over-HTTP” bridging (or tunnelling) where the RMI API is exposed over HTTP to simplify connecting to the worker service through firewalls etc.
Security (Worker 8)
The Worker Service may be configured with a password, which is stored in the config file as a password hash. If the password is not set it will only allow local connections. If it is set it will only accept logins using the password.
For connections from the local machine it will accept the raw hash (which can be read from the config.xml file).
For connections from another machine (i.e. remote access, using the worker manager) it needs the full password, and will only grant the access level specified. For remote access it also needs a Pegasus Worker license or needs to be running in a docker container and be the only worker connected to that server.
The Worker 8 service password is considered “legacy” in Worker 9 and is generally replaced by authenticating via the server.
Editing configuration (Worker 8)
There are different ways of editing the configuration, depending on how the worker service is invoked and whether you are successfully connected to it.
If the worker is a local session service, and the service isn’t currently running or you are not connected to it, then the Worker UI can directly edit the local config.xml file (then launch the worker service, which will read the new config)
If the worker is running as a background service then the Worker UI is unlikely to be able to directly edit the config (if it was this would be a security hole as a regular user shouldn’t be able to edit a config file that tells a super user process what to do, though they may be able to read it if they are an administrator, e.g. to recover a lost password hash).
Instead, as long as the worker service is running and the you are successfully connected to it as above (using either the Worker UI or Worker Manager) and have the correct access level you can edit the configuration by reading the current config xml via the RMI API, making changes, and then sending it back via RMI. (This way you can edit the system config.xml without having direct write access to the file.)
Finally, for container or “cloud” deployments the worker manager can connect to the server to read and write the “cloud config” XML blobs in the database ‘settings’ table.
Separate helper processes (Worker 9)
An internal change in Worker 9 is that the helper processes are now separate processes that manage the “run loop” and operations such as fetching the next task to run themselves. Previously the run loop logic was implemented by separate threads within the worker engine but having separate helper processes gives us flexibility to spin up and shut down instances as required (or have them run on separate machines or in containers).
The helper processes talk to the worker engine and task list via the RMI API, so the IService interface includes both methods for managing the worker and for internal communication. (Currently helper processes authenticate with the engine via the service password hash but to support connections from another machine we may need to extend this and pass in a secret when the worker process is launched.)
This API deals with things like starting the next task, updating the task status while it’s running, whether the worker is shutting down and so on, which would work if the worker processes are in separate containers or another machine. Currently the helper processes also directly read the config file however, so this may need to be reviewed in that situation.
Connecting via server (Worker 9)
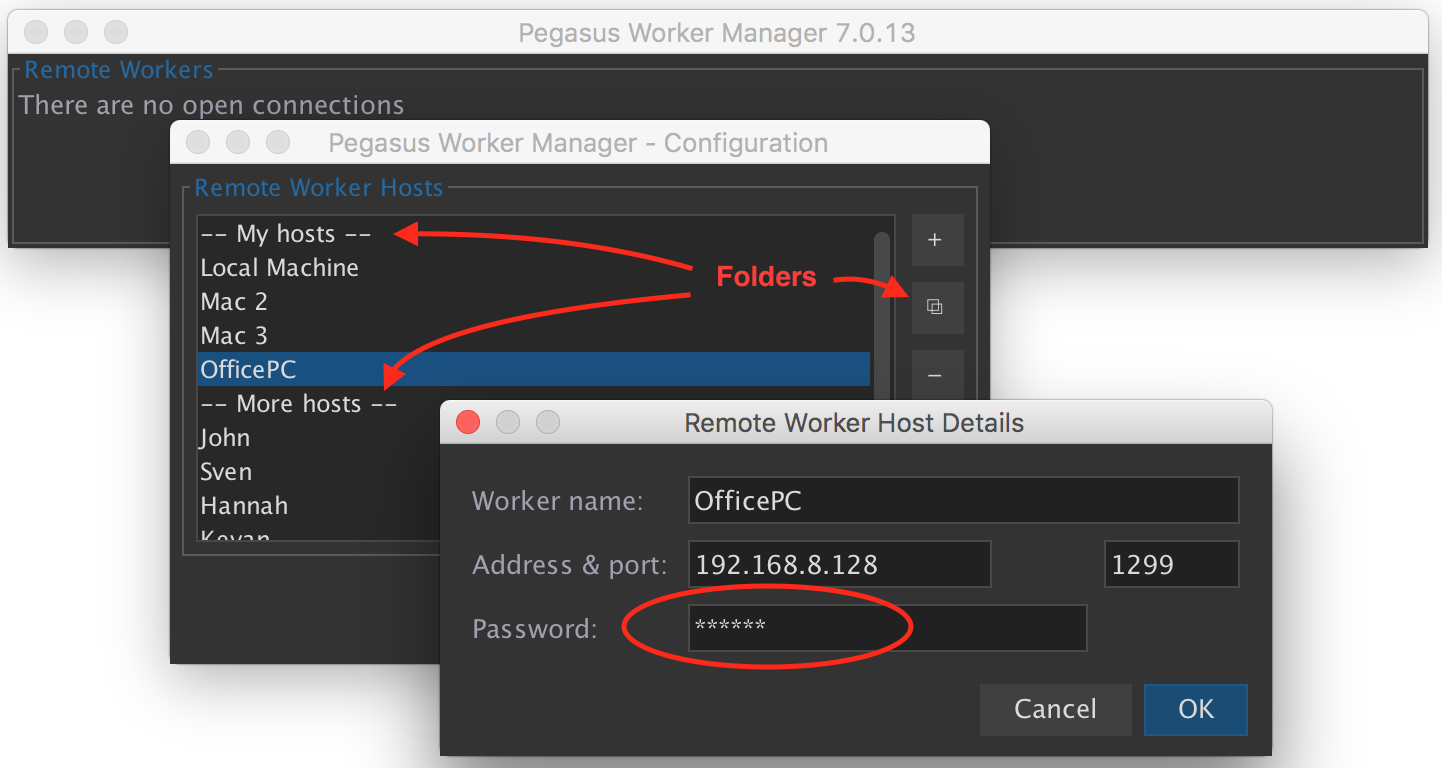
In Worker 8 the worker manager had to be configured with a list of worker hosts that it should connect to and monitor. This is still available in Worker 9 under the “Manual Configuration” menu if required (eg. to manage workers connected to different servers) but in most cases all the workers in a system will be connected to the same CatDV Server, and if the server dashboard in the web admin interface is used, connection details for all the workers will already have been configured on the server.
In Worker 9, therefore, the new recommended way of using the Worker Manager is to log on to the CatDV Server (with your normal CatDV user credentials, including 2FA if that is set up) and to get the list of worker instances to manage from the server. This means the list of workers only has to be set up in one place, and to try and make this even easier whenever a worker service starts up and connects to the server it will automatically register itself if it’s not already there.
Authenticating by logging on to the server also means that we can control the level of access to the worker using CatDV roles, perhaps anybody who is a system administrator can fully manage the worker, while other users can only do basic monitoring.
The way this was done originally was that the worker manager prompted the user for their login details and this was sent (encrypted) over the RMI interface to the worker, which then attempted to log on to the server with those credentials to validate them and check the user’s role(s). It’s obviously not a good idea to store the user’s password on the worker, even temporarily, plus this doesn’t work with two-factor authentication as the worker can’t easily ask the user for their security code, so what we do now is:
1. When the worker service starts up it makes up a random secret and passes that to the server when it registers itself (so that it can trust that subsequent requests have come from the server). This is done in WorkerEngine.initialise()
2. The worker manager logs on to the server using the RMI API to get a list of workers. This is done in DashboardFrame.logOnToServer(), which uses ServerClient.connect() and ServerClient.getSettings()
3. The worker manager keeps that server connection open and makes a note of the connection id by calling ServerClient.getOriginalClientID().
4. The worker manager connects to the worker by making an RMI over HTTP request to the server (eg. to http://localhost:8080/catdv/rmi/worker/7809129), which forwards the request to the worker. The worker manager uses WorkerClient and RmiOverHttpClient, passing the original connection id in the “CatDV-Connection-ID” http request header.
5. On the server, RmiOverHttpServlet.forwardRequestToWorker() looks up the connection using that connection id, and if the connection is still open it knows that the user is successfully logged on via RMI (including having passed any 2FA check). It forwards the RMI-over-HTTP request to the worker service, passing the user and their role(s) and the secret for that worker in http headers to the worker.
6. On the worker, RMIOverHttpHandler.processRequest() checks the secret to make sure it’s a valid request from the server, and passes the user and their roles to WorkerService.connectViaRmiOverHTTP() for it to validate what access the user has.
Troubleshooting worker connections
During initial setup, and to troubleshoot remote connections to the worker service, you will need to review and edit the worker configuration.
For a local session or background system service this involves using the Worker UI on the same machine as the service (if you can’t immediately connect using that, make sure the service is running, and go into Basic Setup and try the Reset button). Make sure the REST API is enabled, and also that the that the CatDV roles for remote access are set up how you want them. If you plan to connect with the legacy password mechanism make sure you know the password and RMI port, as well as the IP address of the worker of course.
If the worker is deployed in a docker container then you need to know the external IP address of the machine hosting the container, and the port mapping that was used to expose the REST API port externally. Although the worker service registers itself with the server, if the worker is running inside a container it has no way of knowing what its external IP address and port number is so you need to provide these. Again, you need to check that the REST API is enabled and that the roles and password etc. are set how you want them.
Once you have the details about you can go into the worker dashboard in the web admin pages and edit the worker connection details. You need the hostname or IP address, HTTP/REST port (not the RMI port), and legacy password if you are using that rather than the CatDV user id and roles for authentication.

Editing config from worker manager
Once you are successfully connected to the service you can use the Edit Config button (with the pencil icon) to make changes to the configuration. If the worker is running as a local or background service it will use the RMI API to remotely edit the configuration via the service, whereas if you are connected to a containerised “cloud worker” whose configuration is stored on the server it will use the CatDV Server’s settings API to edit the cloud config in the database.